


Selenium 网页抓取入门
 约14分钟作者Yelena V
在 Multilogin 中,可以使用 Python 和 Selenium 自动化浏览器配置文件,并从网页收集数据。本文介绍如何连接 Multilogin、启动浏览器配置文件、打开目标页面、查找元素、提取文本、输出结果,并在脚本结束后停止配置文件。
➡️ 准备 Python 和 Selenium → 将脚本连接到 Multilogin → 启动浏览器配置文件 → 打开目标页面 → 找到所需数据 → 提取并输出 → 停止配置文件。
你可以以此示例为起点,编写自己的 Selenium 抓取脚本。
本文会带你逐步编写脚本。如果想参考完整脚本,可以直接滚动到末尾。
开始之前
确保:
- 已安装 Python 和 IDE
requests和selenium已安装- 已准备好一个可用的 Mimic 浏览器配置文件
- 已知道它的
folder_id和profile_id - 拥有有效的 Multilogin API 令牌或自动化令牌
- Multilogin 桌面应用正在运行,或已按当前设置连接所需的代理程序/启动器
第 1 步:准备 IDE 或类似软件
你需要用软件来编写脚本。可以自行选择,我们建议使用 IDE。请先完成以下文章中的前 4 步:自动化脚本入门。
第 2 步:编写连接 API 的脚本并定义函数
这一步需要让脚本使用 API。脚本将包括:
- API 端点
- 用于自动化令牌的变量
- 用于打开和关闭配置文件的函数
- 导入的模块,包括
requests、hashlib、time,以及一些 Selenium 相关模块 - 包含令牌的 Authorization 请求头
使用以下模板:

import requests
import time
from selenium import webdriver
from selenium.webdriver.chromium.options import ChromiumOptions
from selenium.webdriver.firefox.options import Options
from selenium.webdriver.common.by import By

MLX_LAUNCHER = "https://launcher.mlx.yt:45001/api/v1"
MLX_LAUNCHER_V2 = (
    "https://launcher.mlx.yt:45001/api/v2"  # recommended for launching profiles
)
LOCALHOST = "http://127.0.0.1"
HEADERS = {"Accept": "application/json", "Content-Type": "application/json"}
# TODO: Insert your token in the variable below
API_TOKEN = ""
# TODO: Insert the Folder ID and the Profile ID below
FOLDER_ID = ""
PROFILE_ID = ""


def start_profile() -> webdriver:
    r = requests.get(
        f"{MLX_LAUNCHER_V2}/profile/f/{FOLDER_ID}/p/{PROFILE_ID}/start?automation_type=selenium",
        headers=HEADERS,
    )
    response = r.json()
    if r.status_code != 200:
        print(f"\nError while starting profile: {r.text}\n")
    else:
        print(f"\nProfile {PROFILE_ID} started.\n")
    selenium_port = response["data"]["port"]
    driver = webdriver.Remote(
        command_executor=f"{LOCALHOST}:{selenium_port}", options=ChromiumOptions()
    )
    # For Stealthfox profiles use: options=Options()
    # For Mimic profiles use: options=ChromiumOptions()
    return driver


def stop_profile() -> None:
    r = requests.get(f"{MLX_LAUNCHER}/profile/stop/p/{PROFILE_ID}", headers=HEADERS)
    if r.status_code != 200:
        print(f"\nError while stopping profile: {r.text}\n")
    else:
        print(f"\nProfile {PROFILE_ID} stopped.\n")

token = API_TOKEN
HEADERS.update({"Authorization": f"Bearer {token}"})此模板与 Selenium 自动化示例相似,但开头额外导入了以下模块(抓取数据时会用到):
from selenium.webdriver.common.by import By
第 3 步:选择要抓取数据的网页
可以使用任何包含文本的网站,但本文建议使用这个适合练习自动化任务的页面:Large & Deep DOM。
第 4 步:查找目标信息
本例将使用下表中的数据:
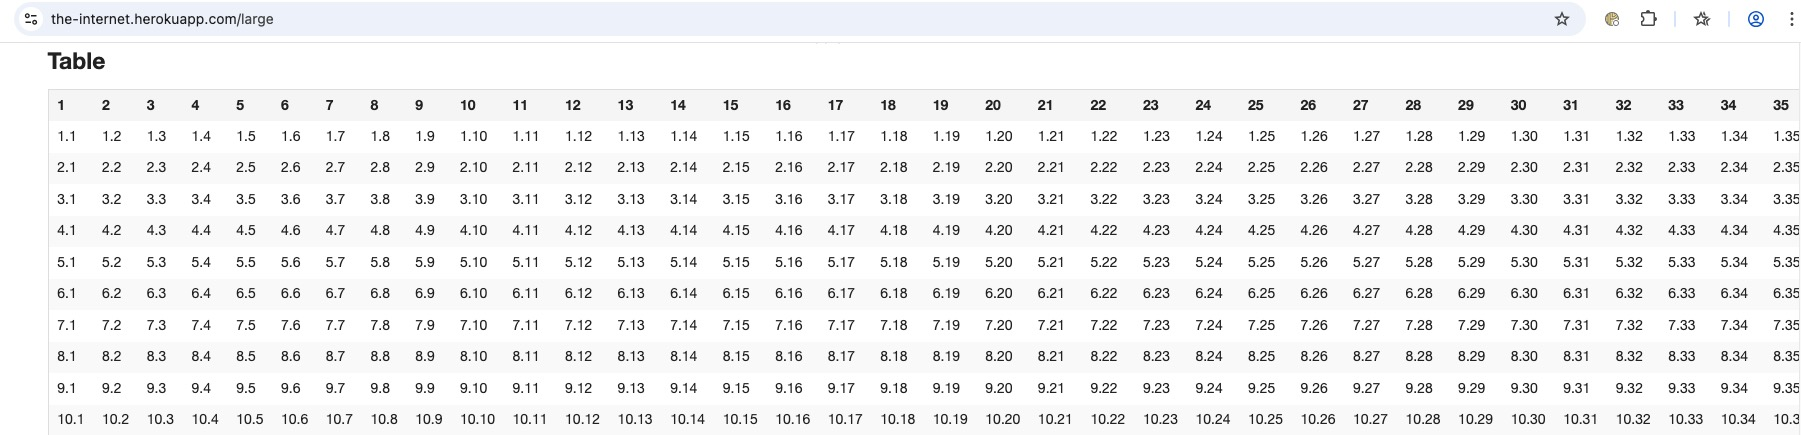
我们会获取表格中的所有值。操作如下:
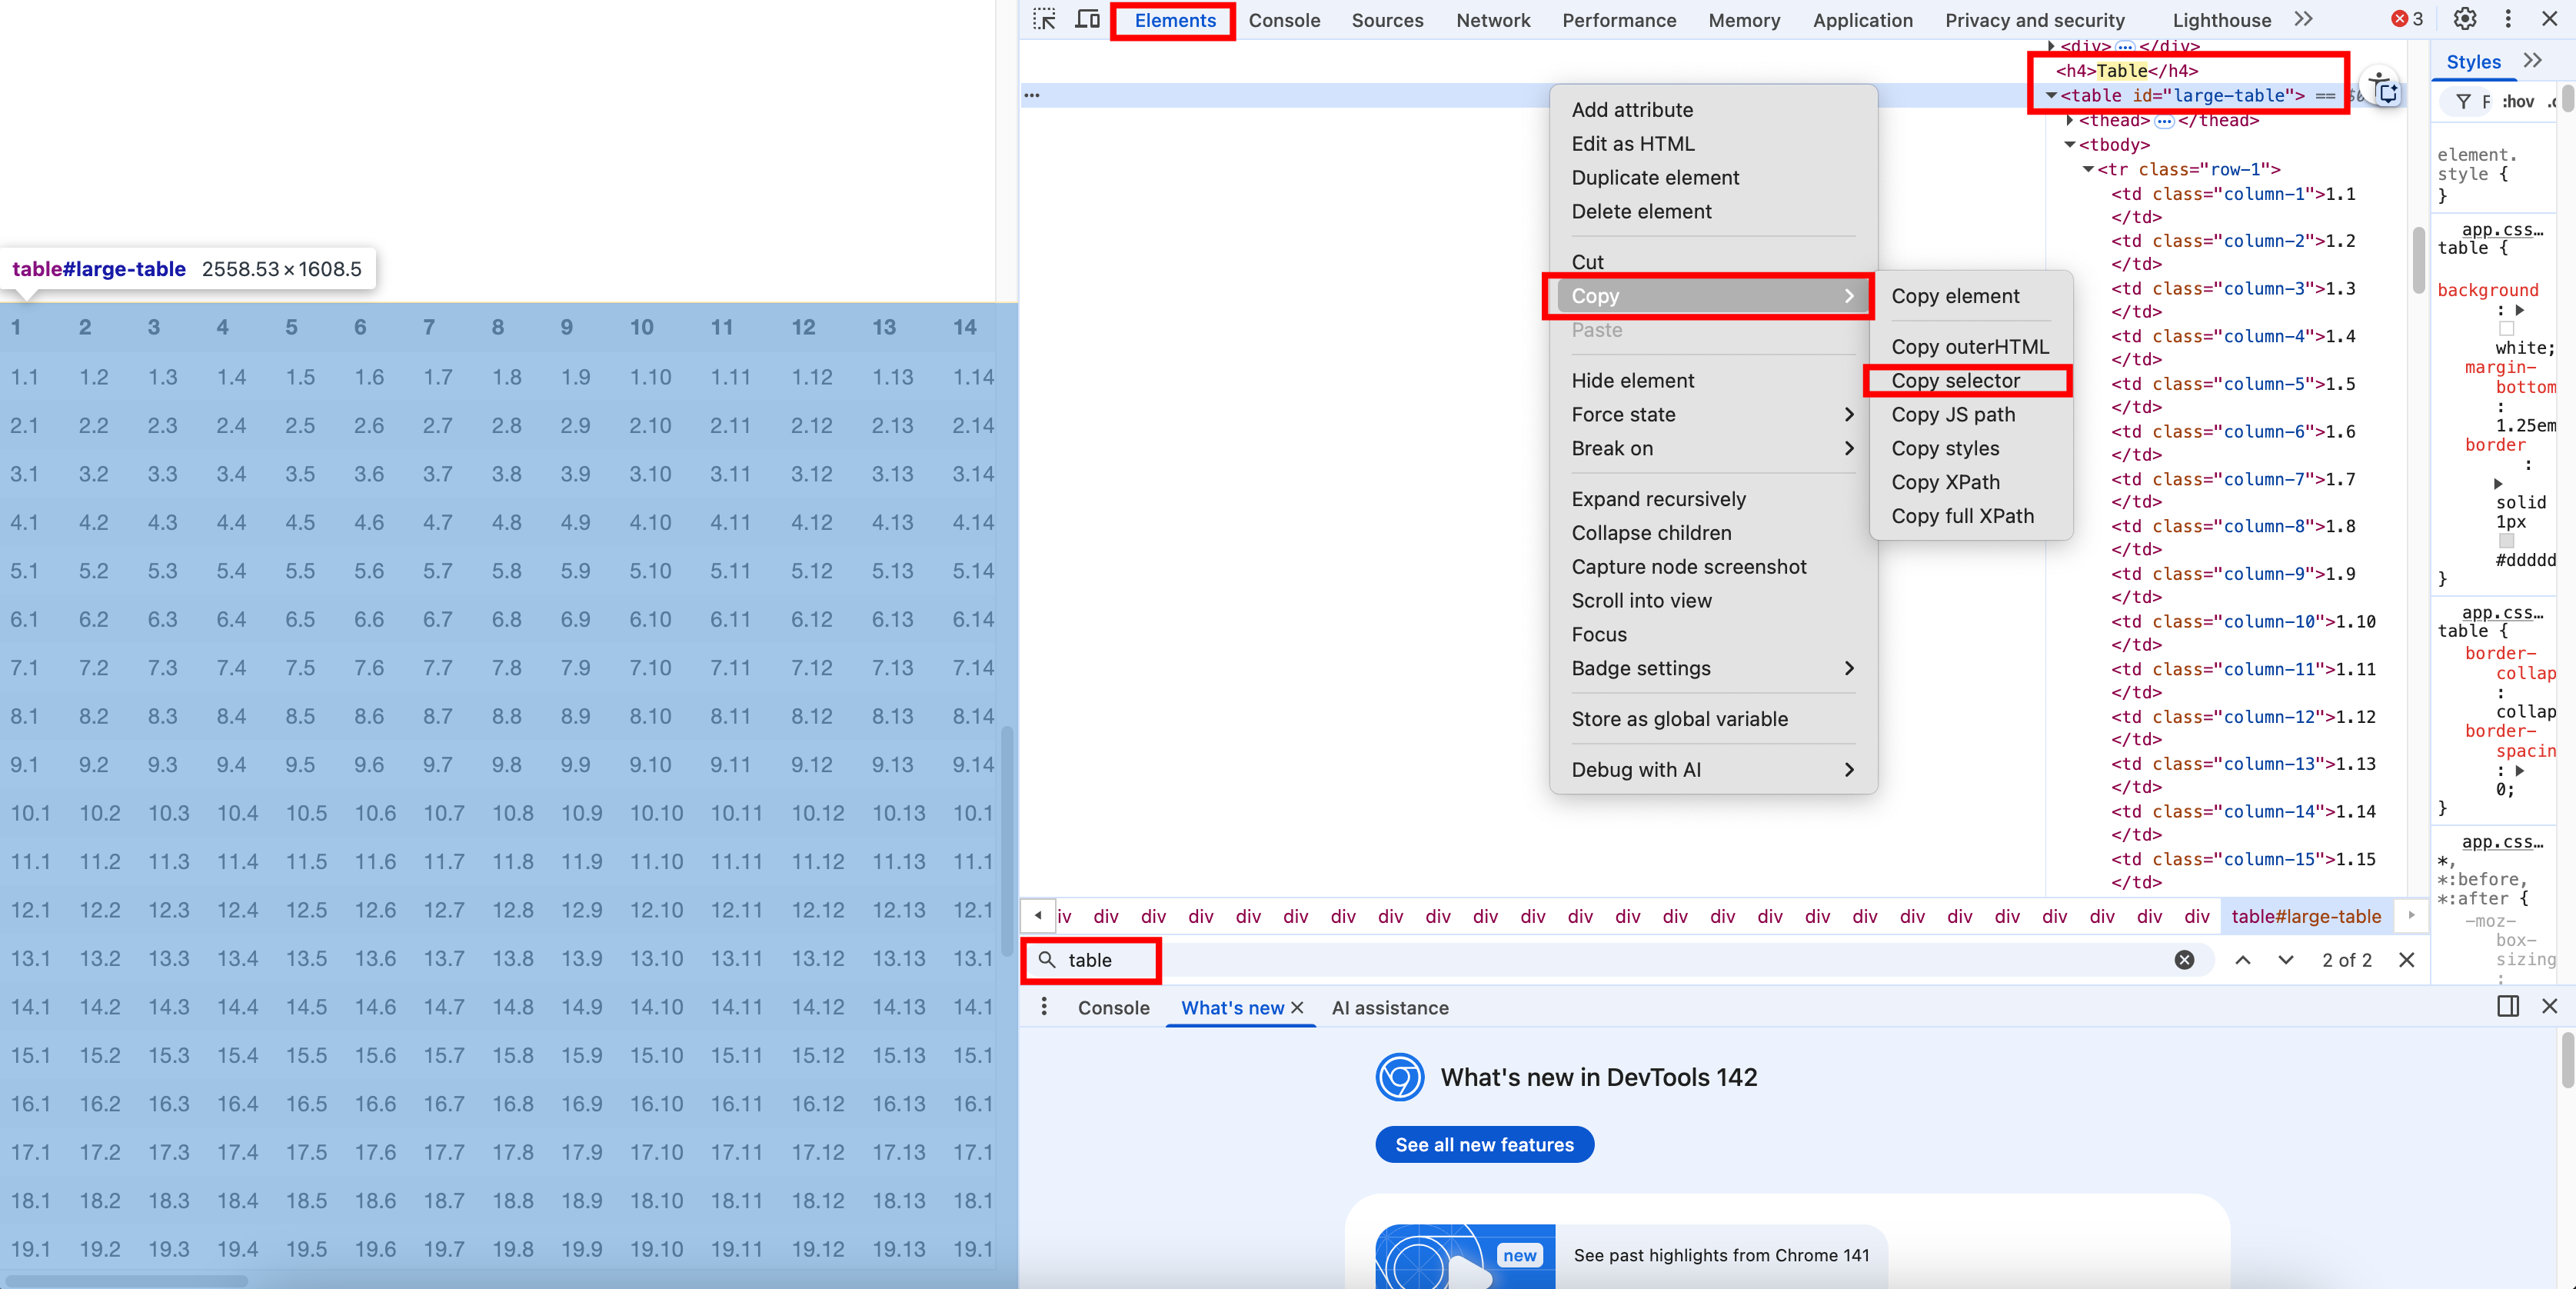
- 在浏览器中打开 DevTools。Chromium 和 Firefox 内核浏览器的打开方法如下:
- Windows 和 Linux:按
Ctrl + Shift + I - macOS:按
Cmd + Option + I
- Windows 和 Linux:按
- 确保已打开“Elements”选项卡
- 使用搜索快捷键查找目标值
- Windows 和 Linux:
CTRL + F - macOS:
Cmd + F
- Windows 和 Linux:
- 输入要查找的文本。本例中为“Table”
- 查找抓取时需要使用的值。本例中为:
<table id="large-table"> - 在“Elements”选项卡中,将鼠标悬停在带标签的元素上
- 点击鼠标右键,再点击“Copy” → “Copy selector”
- 记下这个值,稍后会用到
第 5 步:返回 IDE,添加新的代码行
- 返回所用的 IDE(例如 VS Code)
- 点击代码区域,添加用于打开配置文件并在其中执行操作的变量:
driver = start_profile() - 添加
driver.get(“<your website>”)。本例中的命令如下:driver.get("https://the-internet.herokuapp.com/large") - 接下来需要添加延迟,让脚本在打开网页 5 秒后再执行其他命令:
time.sleep(5)
第 6 步:让脚本查找元素
使用此命令查找元素:driver.find_element(By.<attribute on the page>, "<element>")。它会准确告诉脚本应在页面上查找什么。由于第 4 步复制了 CSS 选择器,实际命令如下:
driver.find_element(By.ID, "large-table")稍后需要获取它的值,因此要为此命令创建一个变量,例如 fetch:
fetch = driver.find_element(By.ID, "large-table")第 7 步:输出最终结果并停止配置文件
- 使用
print()函数输出最终结果。因为需要提取文本值,所以要获取变量中的文本。代码如下:print(fetch.text) - 在末尾添加停止配置文件的函数:
stop_profile() - 保存
.py脚本,完成接下来的准备工作后再运行
第 8 步:运行脚本前的准备工作
- 安装以下 Python 库(更多详情请参考所用 IDE 的文档):
requestsselenium
- 将自己的值填入脚本中的以下变量:
第 9 步:运行脚本
- 打开桌面应用(如果使用网页界面,则连接代理程序)
- 以下脚本默认适用于 Mimic。要用于 Stealthfox,请在以下代码行中将
options=ChromiumOptions()替换为options=Options():driver = webdriver.Remote(command_executor=f'{LOCALHOST}:{selenium_port}', options=ChromiumOptions()) - 运行包含自动化代码的
.py文件
要在 VS Code 中运行脚本,请点击“Run” → “Run without debugging”(或“Start debugging”)。
预期结果:Multilogin 启动选定的 Mimic 浏览器配置文件,Selenium 打开练习页面,找到 ID 为 large-table 的元素,在终端输出表格文本,然后停止配置文件。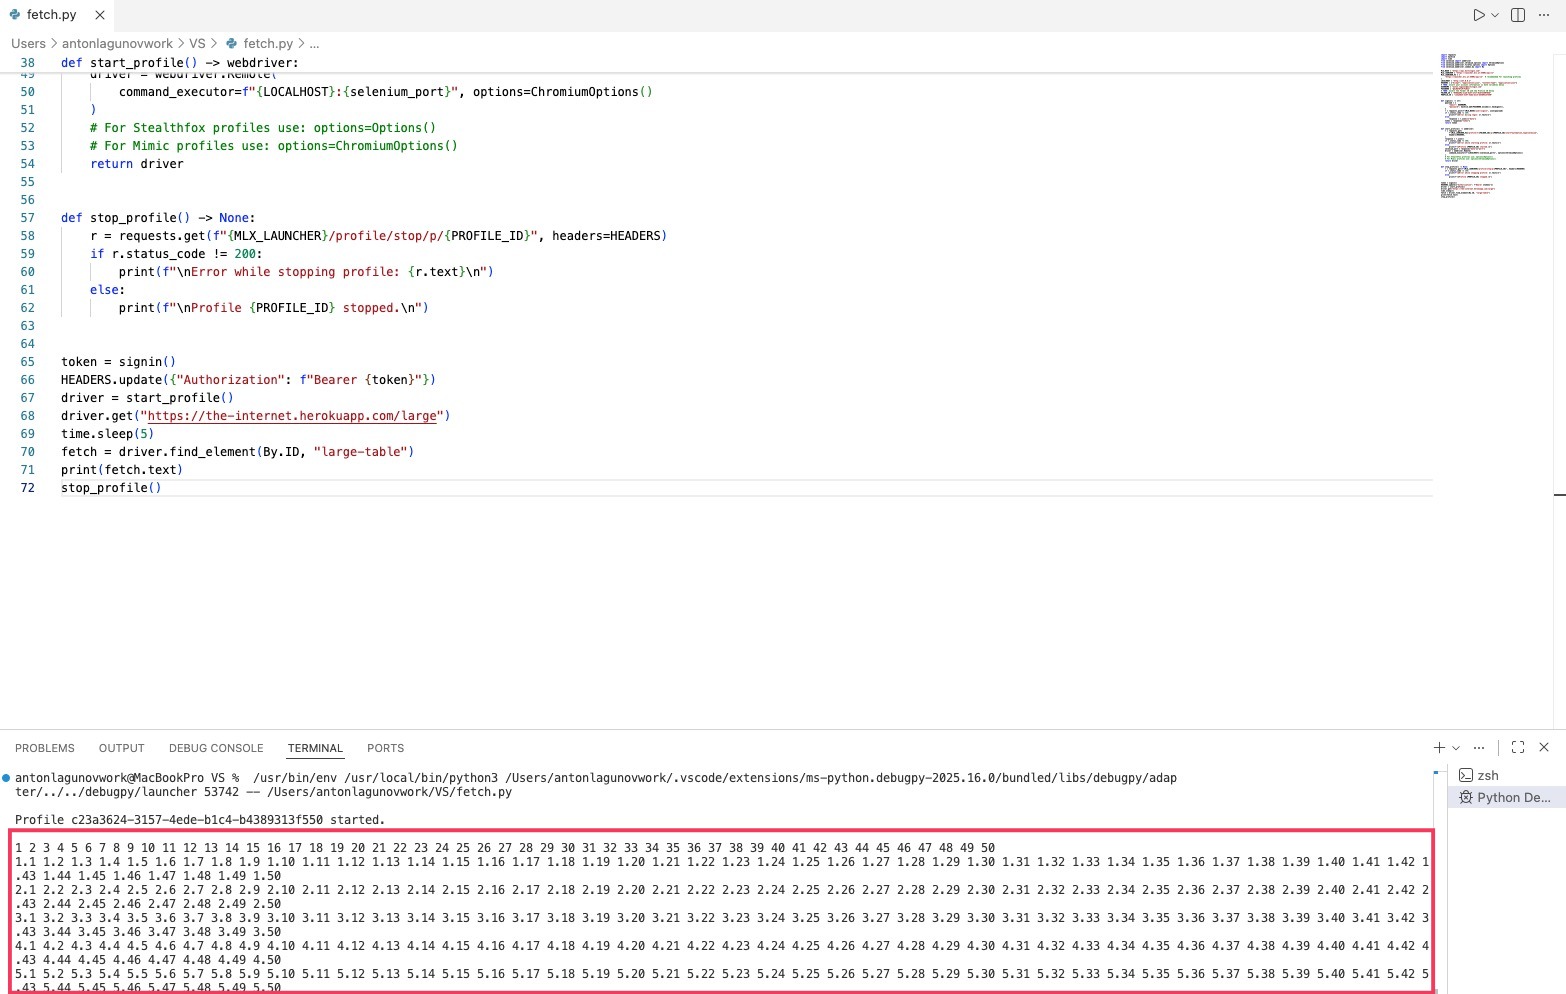
注意事项
恭喜你完成第一个抓取脚本!你还可以尝试更多做法。Python 和 Selenium 都很灵活,还有更多用途。以下是一些提示:
- 如果需要获取多个具有相似值(例如 ID)的元素,可以使用以下函数:
driver.find_elements(By.<attribute on the page>, "<element>") - 可以向 print() 函数添加多个值,更多信息可在网上查找。例如,在
fetch.text前添加文本,可以让输出结果更易读,也方便调试脚本。可以在脚本中尝试以下示例:print("Your values: ", fetch.text) - Selenium 还有更多用法,详情请查看其帮助文档:Selenium 文档
完整脚本
import requests
import time
from selenium import webdriver
from selenium.webdriver.chromium.options import ChromiumOptions
from selenium.webdriver.firefox.options import Options
from selenium.webdriver.common.by import By

MLX_LAUNCHER = "https://launcher.mlx.yt:45001/api/v1"
MLX_LAUNCHER_V2 = (
    "https://launcher.mlx.yt:45001/api/v2"  # recommended for launching profiles
)
LOCALHOST = "http://127.0.0.1"
HEADERS = {"Accept": "application/json", "Content-Type": "application/json"}
# TODO: Insert your token in the variable below
API_TOKEN = ""
# TODO: Insert the Folder ID and the Profile ID below
FOLDER_ID = ""
PROFILE_ID = ""


def start_profile() -> webdriver:
    r = requests.get(
        f"{MLX_LAUNCHER_V2}/profile/f/{FOLDER_ID}/p/{PROFILE_ID}/start?automation_type=selenium",
        headers=HEADERS,
    )
    response = r.json()
    if r.status_code != 200:
        print(f"\nError while starting profile: {r.text}\n")
    else:
        print(f"\nProfile {PROFILE_ID} started.\n")
    selenium_port = response["data"]["port"]
    driver = webdriver.Remote(
        command_executor=f"{LOCALHOST}:{selenium_port}", options=ChromiumOptions()
    )
    # For Stealthfox profiles use: options=Options()
    # For Mimic profiles use: options=ChromiumOptions()
    return driver


def stop_profile() -> None:
    r = requests.get(f"{MLX_LAUNCHER}/profile/stop/p/{PROFILE_ID}", headers=HEADERS)
    if r.status_code != 200:
        print(f"\nError while stopping profile: {r.text}\n")
    else:
        print(f"\nProfile {PROFILE_ID} stopped.\n")


token = API_TOKEN
HEADERS.update({"Authorization": f"Bearer {token}"})
driver = start_profile()
driver.get("https://the-internet.herokuapp.com/large")
time.sleep(5)
fetch = driver.find_element(By.ID, "large-table")
print(fetch.text)
stop_profile()本文包含第三方链接,我们并未对其作出官方背书。


