


Web scraping with Selenium 101
 ~7 minWritten by Yelena V
In Multilogin, you can use Python and Selenium to automate a browser profile and collect data from a webpage. This guide shows you how to connect to Multilogin, start a browser profile, open a target page, find an element, extract its text, print the result, and stop the profile when the script finishes.
➡️ Prepare Python and Selenium → connect your script to Multilogin → start the browser profile → open the target page → locate the data you need → extract and print it → stop the profile.
Use this example as a starting point for your own Selenium scraping scripts.
This article is meant for creating your script step-by-step. If you want to use the full script for reference – feel free to scroll to the end.
Before you start
Make sure:
- Python and an IDE are installed
-
requestsandseleniumare installed - You have a Mimic browser profile ready to use
-
You know its
folder_idandprofile_id - You have a valid Multilogin API or automation token
- The Multilogin desktop app is running, or the required agent/launcher is connected for your setup
Step 1: prepare IDE or similar software
You'll need anything to write your script. It's up to you what to use, but we recommend to use IDE for that. Follow the first 4 steps from the following article: Getting started with automation scripting.
Step 2: create the script connecting to API and define functions
In this step, you'll need to make the script work with API. The script will include:
- API endpoints
- Variable for your automation token
- Defined functions for opening and closing the profile
- Imported modules, including
requests,time. Some modules related to Selenium will be included as well - Authorization header with your token
Use the following template for it:

import requests
import time
from selenium import webdriver
from selenium.webdriver.chromium.options import ChromiumOptions
from selenium.webdriver.firefox.options import Options
from selenium.webdriver.common.by import By

MLX_LAUNCHER = "https://launcher.mlx.yt:45001/api/v1"
MLX_LAUNCHER_V2 = (
    "https://launcher.mlx.yt:45001/api/v2"  # recommended for launching profiles
)
LOCALHOST = "http://127.0.0.1"
HEADERS = {"Accept": "application/json", "Content-Type": "application/json"}
# TODO: Insert your token in the variable below
API_TOKEN = ""
# TODO: Insert the Folder ID and the Profile ID below
FOLDER_ID = ""
PROFILE_ID = ""


def start_profile() -> webdriver:
    r = requests.get(
        f"{MLX_LAUNCHER_V2}/profile/f/{FOLDER_ID}/p/{PROFILE_ID}/start?automation_type=selenium",
        headers=HEADERS,
    )
    response = r.json()
    if r.status_code != 200:
        print(f"\nError while starting profile: {r.text}\n")
    else:
        print(f"\nProfile {PROFILE_ID} started.\n")
    selenium_port = response["data"]["port"]
    driver = webdriver.Remote(
        command_executor=f"{LOCALHOST}:{selenium_port}", options=ChromiumOptions()
    )
    # For Stealthfox profiles use: options=Options()
    # For Mimic profiles use: options=ChromiumOptions()
    return driver


def stop_profile() -> None:
    r = requests.get(f"{MLX_LAUNCHER}/profile/stop/p/{PROFILE_ID}", headers=HEADERS)
    if r.status_code != 200:
        print(f"\nError while stopping profile: {r.text}\n")
    else:
        print(f"\nProfile {PROFILE_ID} stopped.\n")

token = API_TOKEN
HEADERS.update({"Authorization": f"Bearer {token}"})The template is similar to Selenium automation example, except it has the following imported module at the beginning (we will need for scraping):
from selenium.webdriver.common.by import By
Step 3: choose web page to scrape data from
You can use any website that contains text, but for this guide, we recommend trying this page – it’s great for practicing automation tasks: Large & Deep DOM.
Step 4: look for the target info
In our case, it will be the data from the table below:
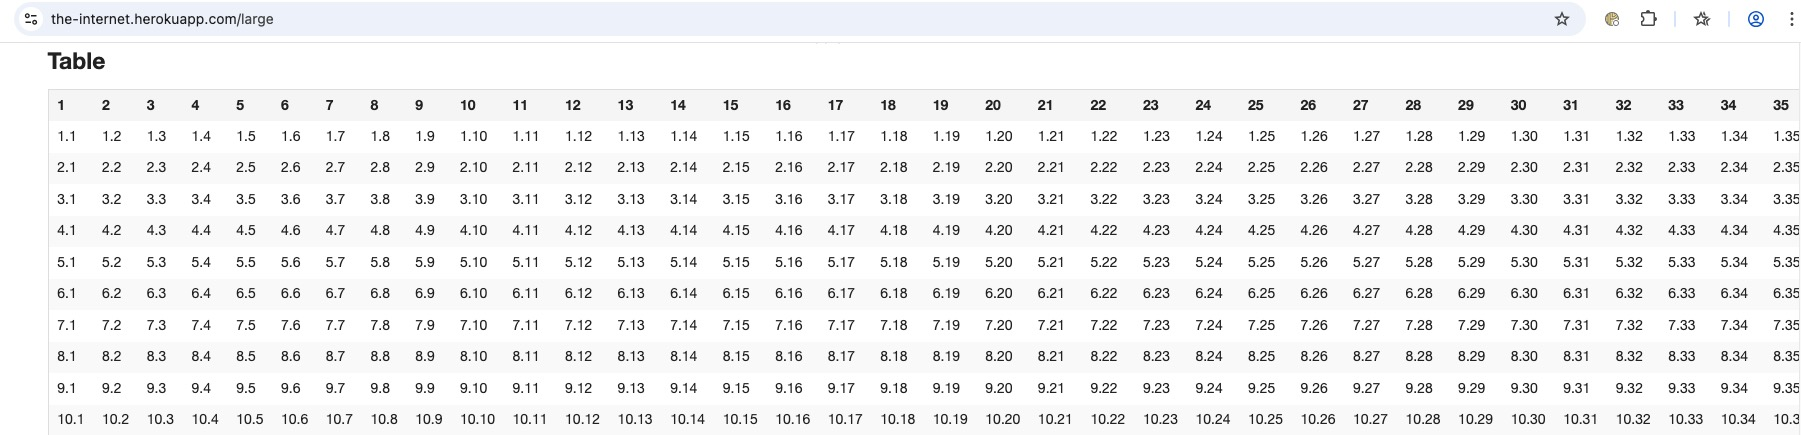
We'll get all the values from the table. Here's what you can do:
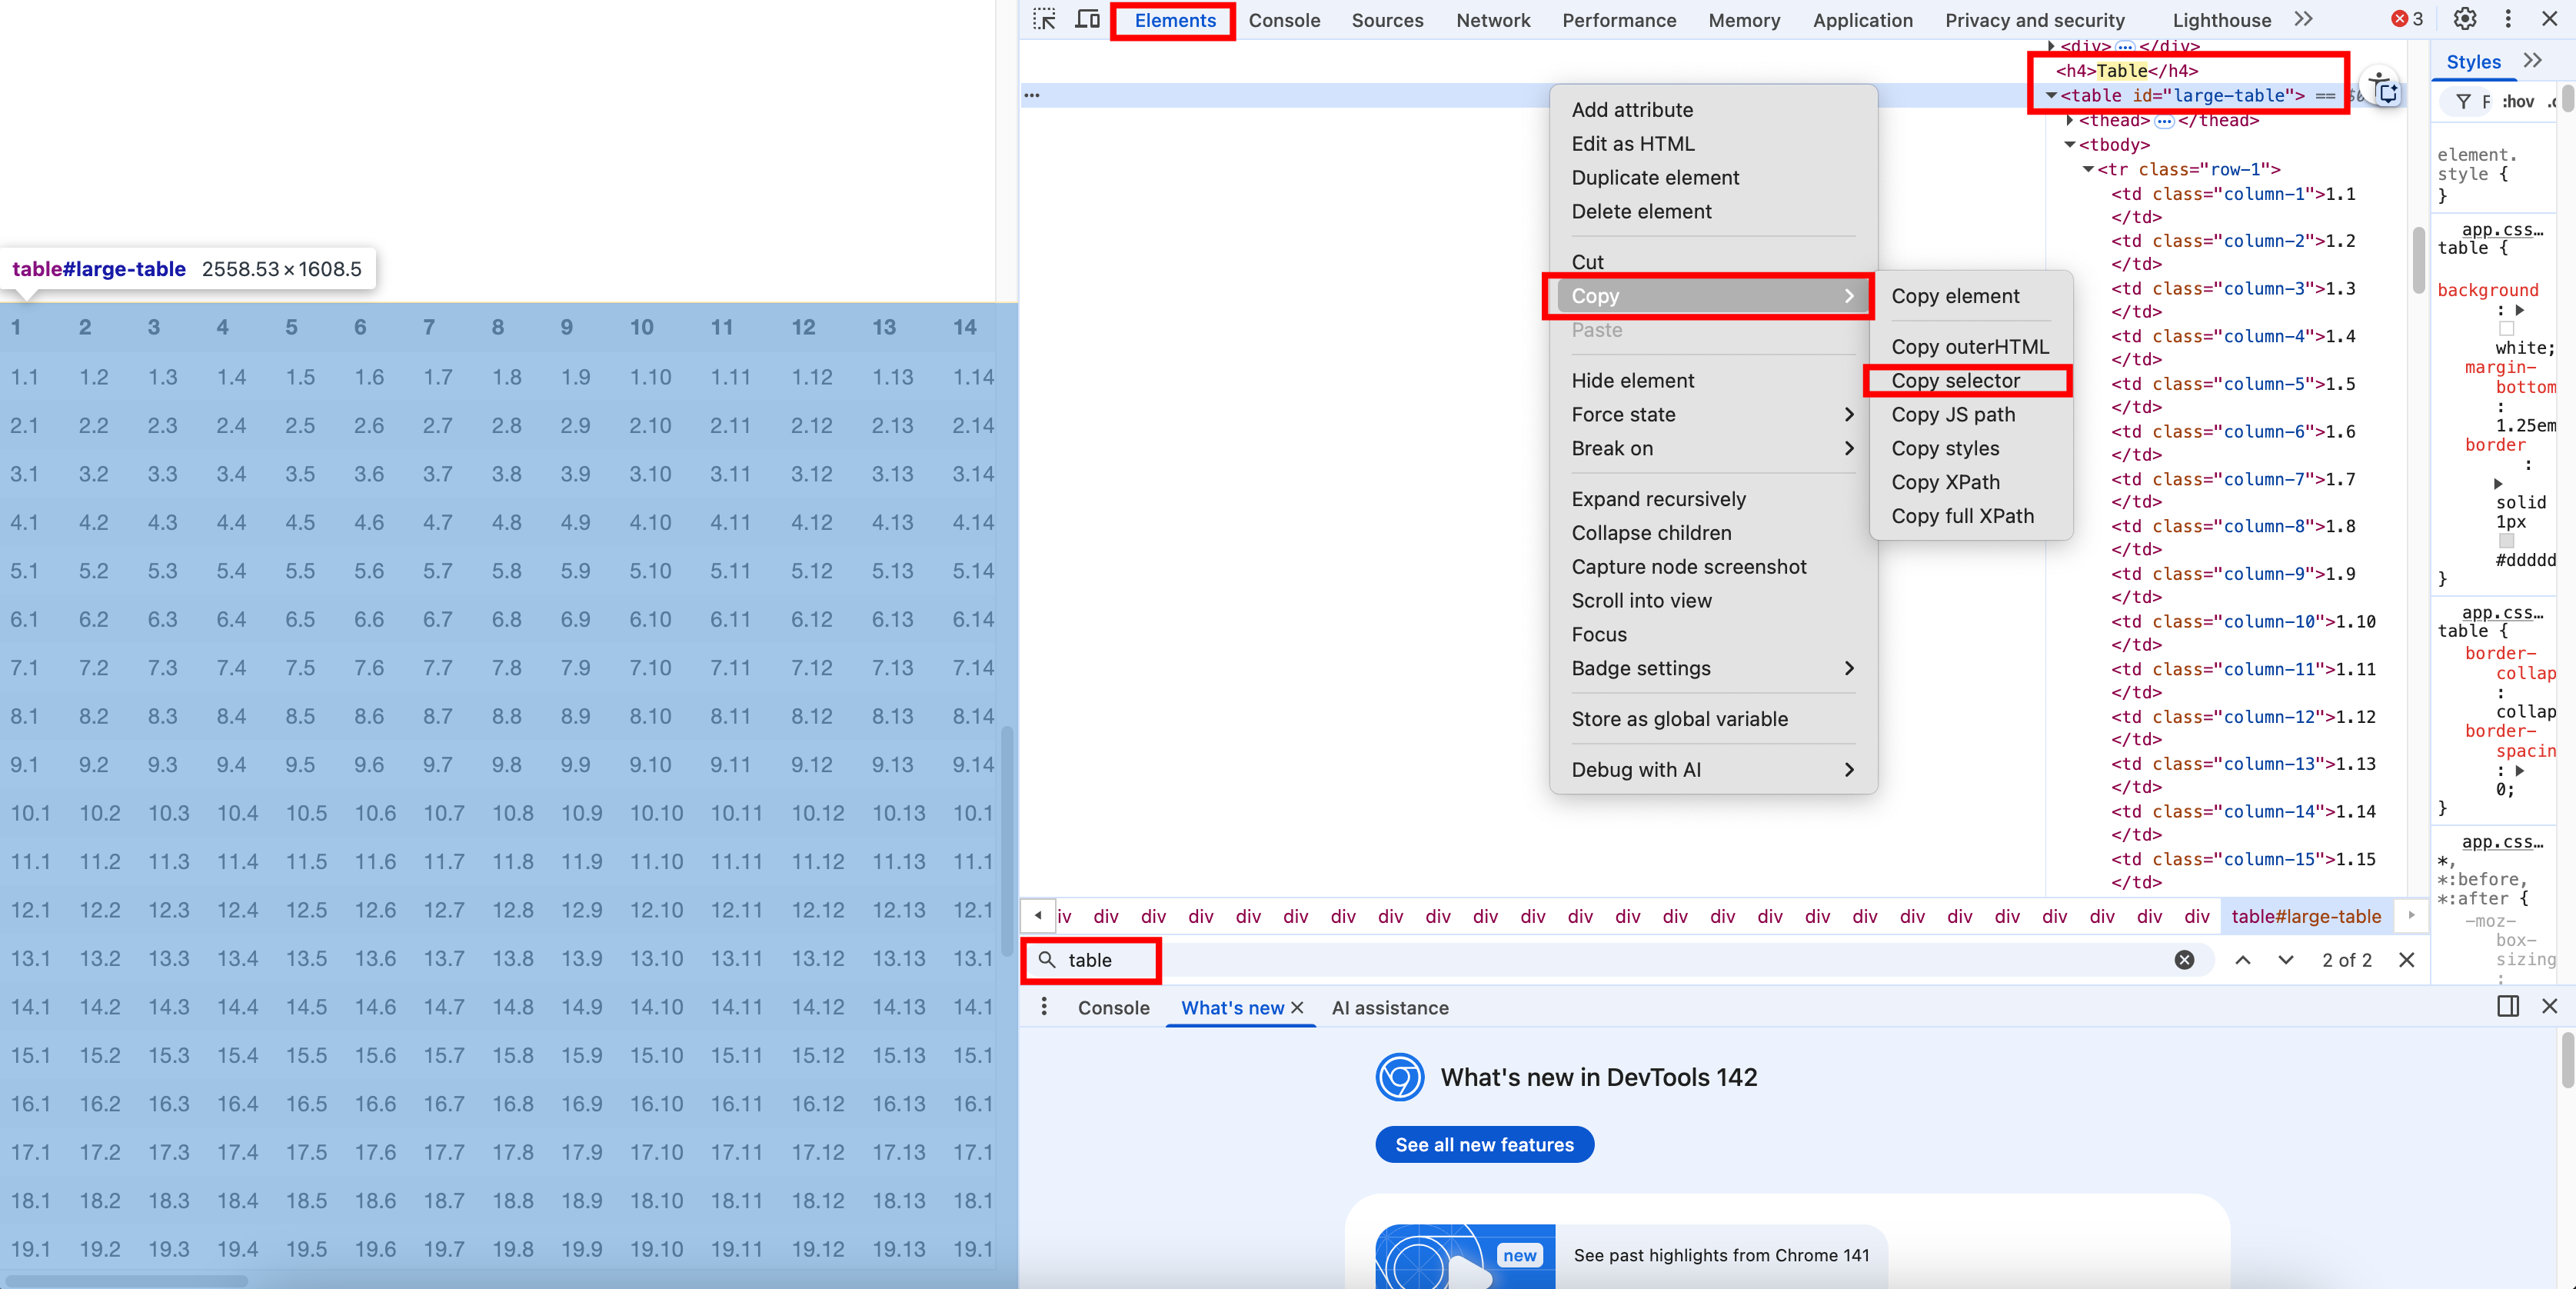
- Open DevTools in your browser. Here's how to do that for Chromium- and Firefox-based browsers:
- Windows and Linux: press
Ctrl + Shift + I - macOS: press
Cmd + Option + I
- Windows and Linux: press
- Make sure that you are on the “Elements” tab
- Use search hot key to find the target value
- Windows and Linux:
CTRL + F - macOS:
Cmd + F
- Windows and Linux:
- Type the text value you want to see. In our case, it is “Table”
- Look for the value you will need to use for scraping. In our case, it will be the following:
<table id="large-table"> - Hover the element with the tags in the “Elements” tab
- Right click and then left click “Copy” – “Copy selector”
- Write down the value somewhere – you'll need it later
Step 5: get back to IDE and add new strings of code
- Get back to the IDE of your choice (for example, VS Code)
- Click the code field and add a variable for opening and performing actions in the profile:
driver = start_profile() - Add
driver.get(“<your website>”). In our case, it'll be the following command:driver.get("https://the-internet.herokuapp.com/large") - Now we need some delay for the script, so it will try to do the other commands 5 seconds after opening the web page:
time.sleep(5)
Step 6: make the script to find the element
Use this command to find the element: driver.find_element(By.<attribute on the page>, "<element>"). It tells the script exactly what to look for on the page. Since we copied the CSS selector in step 4, your actual command will look like this:
driver.find_element(By.ID, "large-table")We'll need to get its value later, so we need to make a variable for the command, for example, fetch:
fetch = driver.find_element(By.ID, "large-table")Step 7: print the end result and stop the profile
- Use
print()function to print the end result. As we need to extract text value, we need to get the text from our variable. The result will be the following:print(fetch.text) - Add the function to stop the profile at the end:
stop_profile() - Save the
.pyscript, you'll need to run after some extra steps
Step 8: prepare the script before running it
- Install the following Python libraries (look for documentation of your IDE for more details):
requestsselenium
- Insert your values into the below variables in the script:
Step 9: run the script
- Open the desktop app (or connect the agent if you are using the web interface)
- By default, the script below works for Mimic. To use it for Stealthfox, replace
options=ChromiumOptions()withoptions=Options()in the following line:driver = webdriver.Remote(command_executor=f'{LOCALHOST}:{selenium_port}', options=ChromiumOptions()) - Run the
.pyfile with your automation code
In order to run the script in VS Code, сlick “Run” → “Run without debugging” (or “Start debugging”).
Expected result: Multilogin starts the selected Mimic browser profile, Selenium opens the practice page, finds the element with ID large-table, prints the table text in the terminal, and then stops the profile.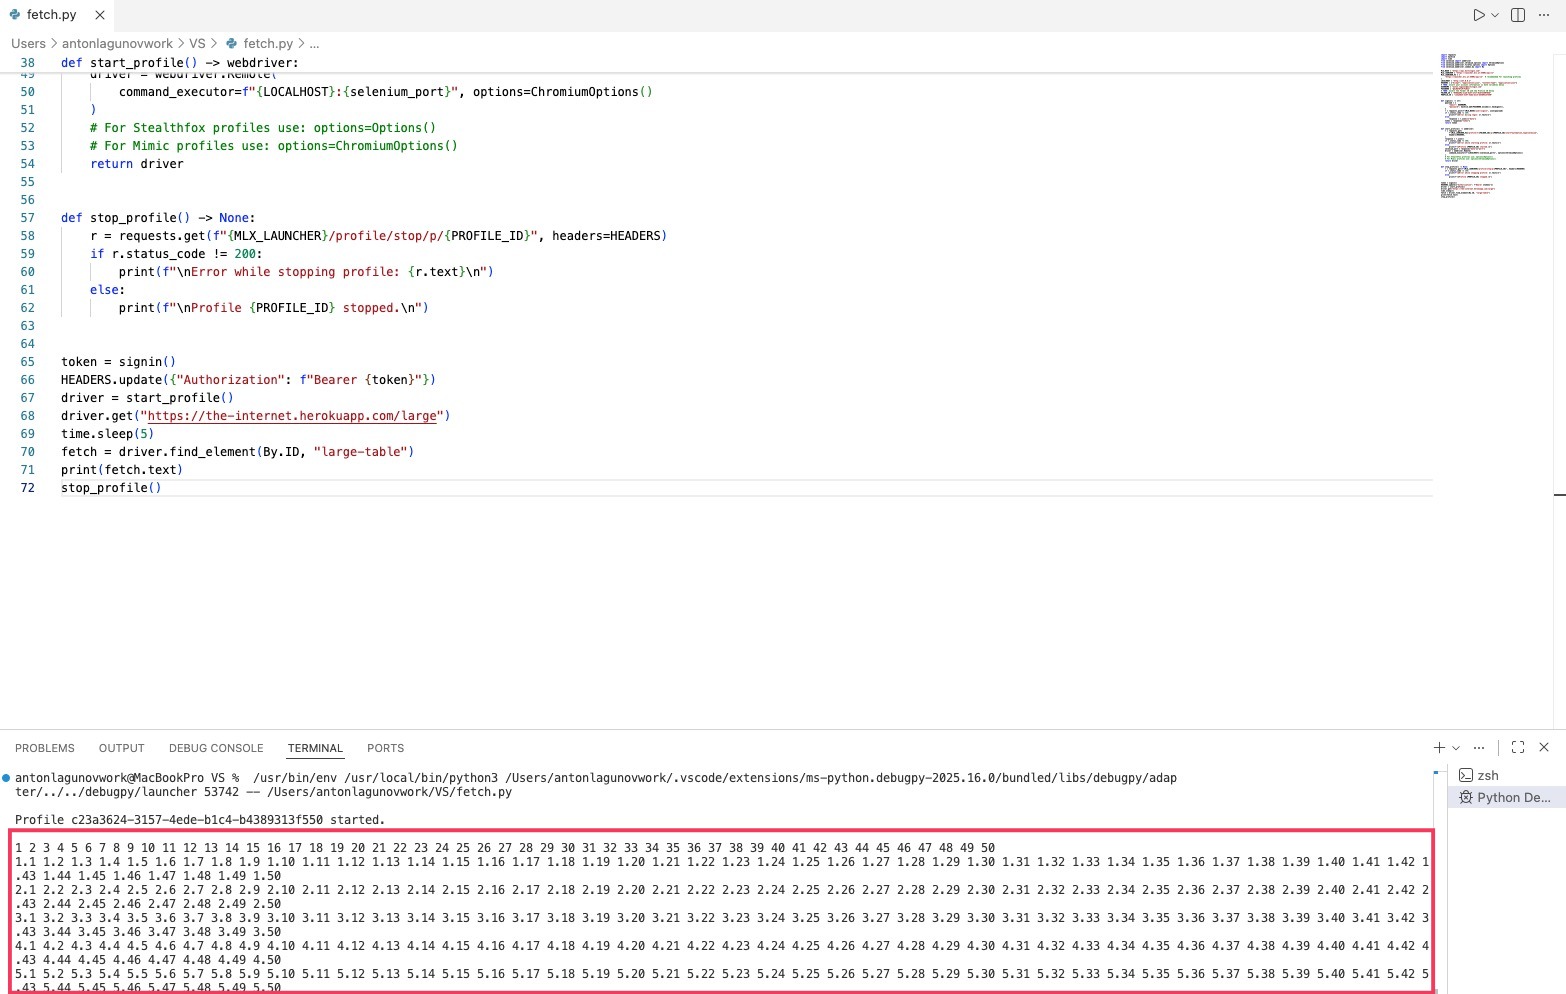
Notes
Congratulations with your first scraping script! You are not restricted to those only options. Python and Selenium are quite flexible tools, and there is more potential to them. Here are a couple of tips:
- If you need to fetch several values by similar values (for example, IDs), you can use the following function:
driver.find_elements(By.<attribute on the page>, "<element>") - You can add several values to the print() function. You can find more info about it in Internet. For example, you can add the text before the
fetch.text. It will make the printing result more readable, and it can be also useful for debugging the script. Here is the example which you can test out in the script:print("Your values: ", fetch.text) - There are more ways of implementing Selenium. Check their help center for more details: Selenium Documentation
Full script
import requests
import time
from selenium import webdriver
from selenium.webdriver.chromium.options import ChromiumOptions
from selenium.webdriver.firefox.options import Options
from selenium.webdriver.common.by import By

MLX_LAUNCHER = "https://launcher.mlx.yt:45001/api/v1"
MLX_LAUNCHER_V2 = (
    "https://launcher.mlx.yt:45001/api/v2"  # recommended for launching profiles
)
LOCALHOST = "http://127.0.0.1"
HEADERS = {"Accept": "application/json", "Content-Type": "application/json"}
# TODO: Insert your token in the variable below
API_TOKEN = ""
# TODO: Insert the Folder ID and the Profile ID below
FOLDER_ID = ""
PROFILE_ID = ""


def start_profile() -> webdriver:
    r = requests.get(
        f"{MLX_LAUNCHER_V2}/profile/f/{FOLDER_ID}/p/{PROFILE_ID}/start?automation_type=selenium",
        headers=HEADERS,
    )
    response = r.json()
    if r.status_code != 200:
        print(f"\nError while starting profile: {r.text}\n")
    else:
        print(f"\nProfile {PROFILE_ID} started.\n")
    selenium_port = response["data"]["port"]
    driver = webdriver.Remote(
        command_executor=f"{LOCALHOST}:{selenium_port}", options=ChromiumOptions()
    )
    # For Stealthfox profiles use: options=Options()
    # For Mimic profiles use: options=ChromiumOptions()
    return driver


def stop_profile() -> None:
    r = requests.get(f"{MLX_LAUNCHER}/profile/stop/p/{PROFILE_ID}", headers=HEADERS)
    if r.status_code != 200:
        print(f"\nError while stopping profile: {r.text}\n")
    else:
        print(f"\nProfile {PROFILE_ID} stopped.\n")


token = API_TOKEN
HEADERS.update({"Authorization": f"Bearer {token}"})
driver = start_profile()
driver.get("https://the-internet.herokuapp.com/large")
time.sleep(5)
fetch = driver.find_element(By.ID, "large-table")
print(fetch.text)
stop_profile()This article includes third-party links that we don’t officially endorse.


