

- Home
-

- Multilogin X (latest)
-
- Migration to Multilogin X
-
- How to migrate from Multilogin 6 to Multilogin X: guide
How to migrate from Multilogin 6 to Multilogin X: guide
 Written by
( Updated on January 19th, 2026 )
Written by
( Updated on January 19th, 2026 )
Updated on January 19th, 2026
We’re here to help! Most users choose to migrate with the help of our Support team to make sure everything goes smoothly. We’ll even set up a quick session to guide you through it. Prefer to do it yourself? No problem – just reach out and we’ll send you the build.
Check the migration Q&A article to get answers to your questions, or start a chat with us for instant help.
Step 1: check your account and subscription
Before starting the migration, make sure you have the following:
- Install the special migration build: request support to provide you with the latest version of the migration tool.
- Paid Multilogin 6 subscription: only Owner accounts (paid users) are able to migrate profiles. Migration can't be performed by team members.
- Account credentials: ensure you remember the email and password for both your Multilogin 6 and Multilogin X accounts. If you don’t yet have a Multilogin X account, one will be created automatically during the migration.
Step 2: prepare your profiles for migration
To make the migration process smoother, follow these preparation steps:
- Organize profiles: group your profiles into sets of 1–100 profiles per group. This is important because migrating large groups of profiles at once can take time, and smaller batches help prevent connection issues
- Launch and stop the profiles to get the latest core: all the profiles you plan to migrate need to be launched and then stopped in Multilogin 6 before you start the migration
Test with a small group: if you have a lot of profiles to migrate, start with a small test group (up to 10 profiles) to ensure everything works smoothly before migrating larger groups. If the test folder is migrated as expected, proceed with other folders with 1–100 profiles* each.
It's not recommended to have more than 100 profiles in a single folder: with over 100 profiles, the data size can become quite large, and migration may take longer. Additionally, any connection interruptions during the process could result in corrupted profiles.
Step 3: start the migration
Once everything is ready, you can begin the migration process.
If you already have a Multilogin X account with the same email as your Multilogin 6 account, the profiles will automatically transfer to Multilogin X.
If you don’t have a Multilogin X account, one will be created for you automatically during the migration, using the same credentials as your Multilogin 6 account.
The migration of each profile usually takes 10 seconds to 1 minute, depending on the profile data and your internet connection. Larger profiles (e.g., those with heavy session data or cookies) might take longer to migrate.
- Create or pick a group of profiles that you'd like to migrate
- Remember the name of the group (its exact spelling) or save it in your notes
- Log out of Multilogin 6 migration build: click “My account” → “Log out”

- Click “Migrate to Multilogin X” on the welcome page
- Fill out all the fields and click “Start migration to Multilogin X”

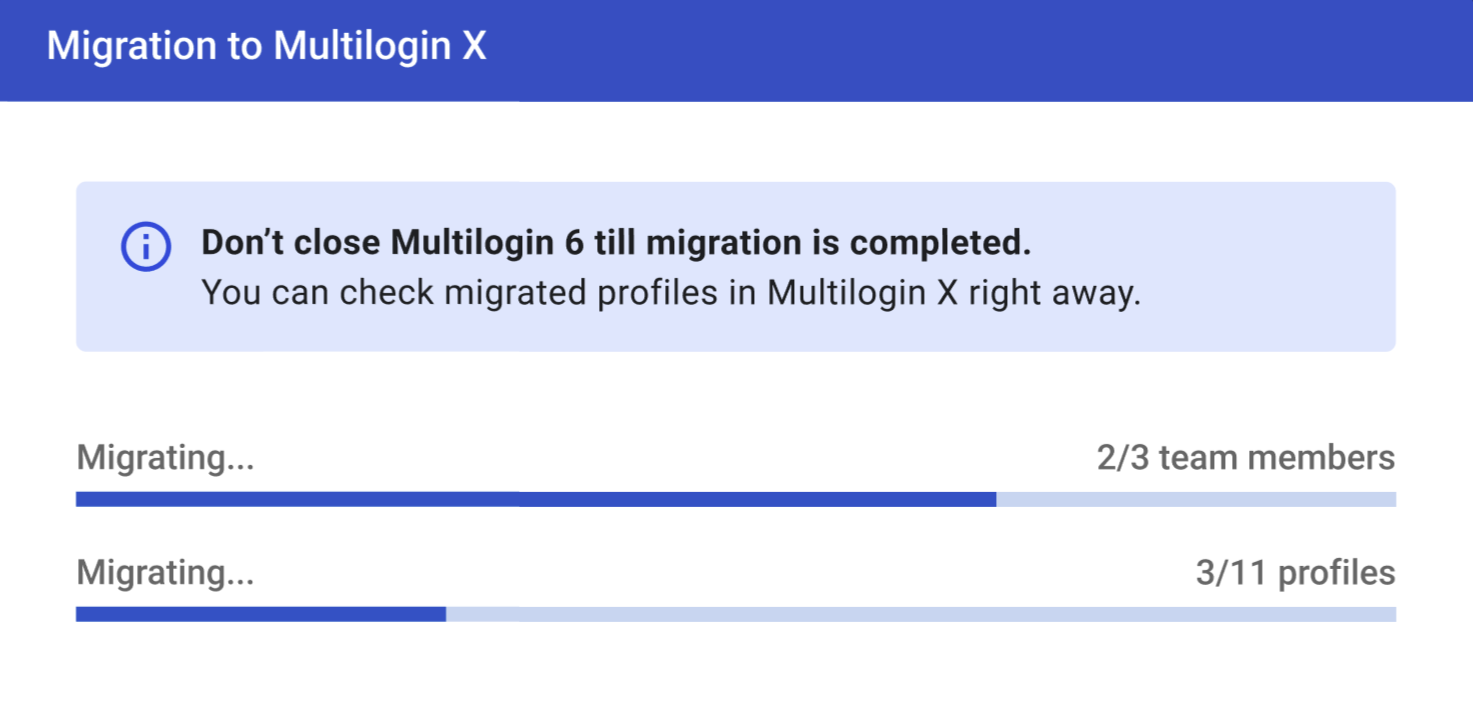
Step 4: monitor the migration progress
During the migration, you’ll see real-time progress in the app. If you’re migrating multiple profiles, you can track each one individually.
Once the migration begins, make sure to keep the app open and avoid closing or updating it until the process is complete. A stable internet connection will help ensure the migration finishes smoothly.
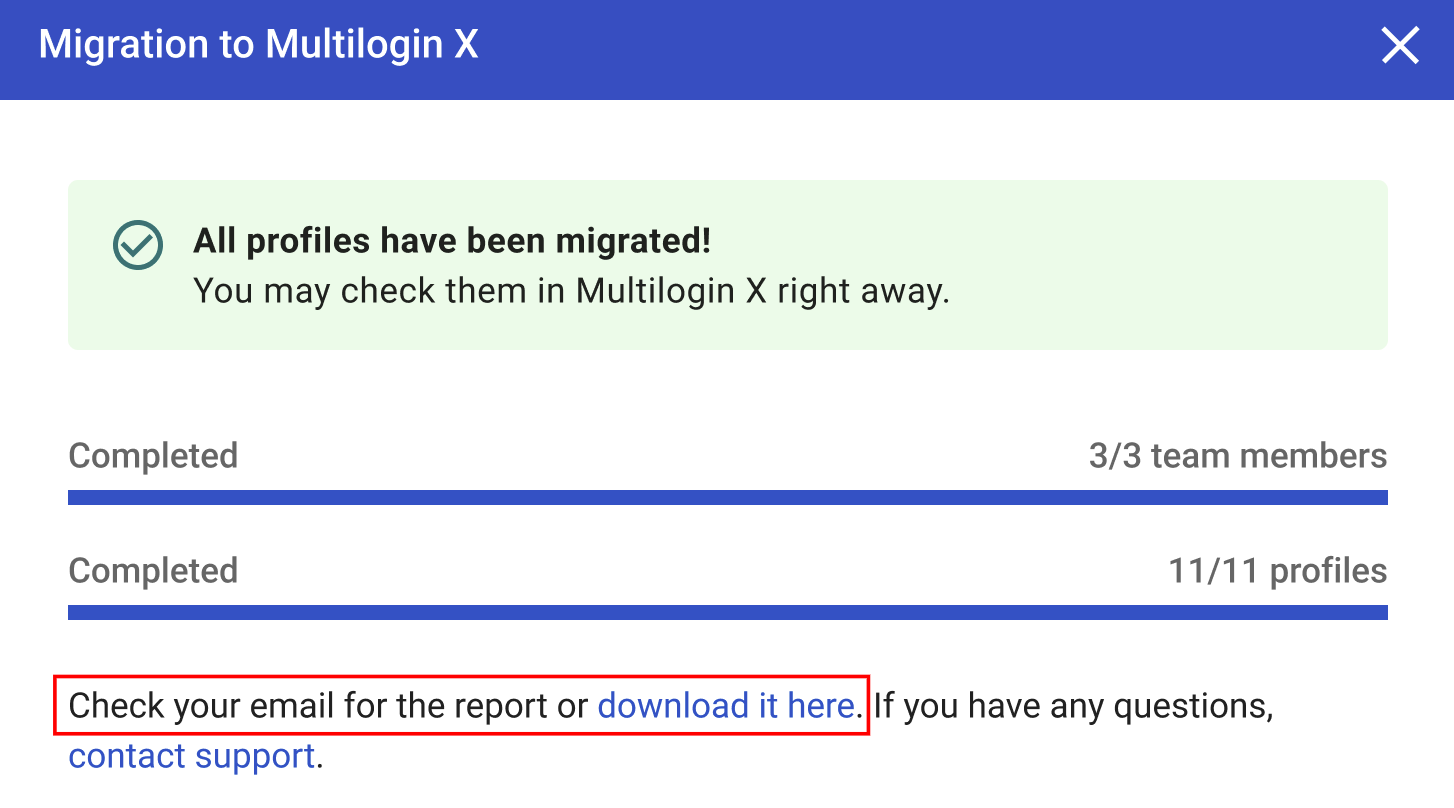
Once completed, you can download a report, continue to Multilogin X or migrate another group of profiles.
Step 5: check your profiles in Multilogin X
Once the migration is complete, you can immediately start using your profiles in Multilogin X. All the migrated profiles should be fully functional and ready to use.
However, note that profiles migrated to Multilogin X will no longer sync with Multilogin 6. If you continue to use them in both apps after migration, this may cause data discrepancies or account issues.
Also, be aware that you can only migrate each profile once. Once the migration is finished, any changes made in Multilogin 6 won’t be reflected in Multilogin X.
The migrated profiles will be marked with a green checkmark in your Multilogin 6 account.

Step 6 (team owners only): manage your team's permissions
If you’re working with a team, your team members will automatically retain access to the groups they were assigned to in Multilogin 6. However, please note that Multilogin X uses a new system of team roles and permissions. All team members migrated from Multilogin 6 will be given Launcher permissions by default. As the product owner, you’ll need to manually assign new roles and permissions as needed.
All team members migrated from Multilogin 6 will be given Launcher permissions by default.
Step 7: post-migration steps and troubleshooting
After migration, you can use Multilogin X as normal. If you encounter any issues, you’ll receive a migration report via email that can help you troubleshoot any problems.
Profiles that failed to migrate will be marked with an exclamation icon in your Multilogin 6 account.

If anything goes wrong, send the migration report to our support team.
Learn more: troubleshooting
Profiles are failed to migrate
Check if you've followed migration requirements:
- Profiles have the latest core (were launched and stopped before the migration attempt)
- Profiles are placed in groups 1-100 each
- Profiles are not mobile (the migration tool can't transfer them yet)
Migrated profiles are not launching in Multilogin X
Make sure to complete these steps:
- Check if your system meets our requirements
- Click “Edit” → “Check proxy” – if the check fails, the issue is caused by the proxy being offline
Is self-check doesn't help, report the issue to us
Send the following details to our support team:
- An error message you are getting
- An archive with application log files
- A list of IDs or names of profiles that can not be launched
