
Creating a Facebook event sounds simple. And for one account on a personal profile, it is. But if you’re managing events for multiple clients, running them from a business page, or juggling different account types across devices — it gets complicated fast.
This guide covers every setup: personal profile, business page, group, desktop, mobile app, and iPhone. Plus what to do when you need to manage multiple Facebook accounts without getting them flagged.
Try Multilogin now to manage events and content across multiple Facebook accounts from a single dashboard.
How to create a Facebook event on desktop
This is the most complete version of the event creator. You get access to all options from a browser.
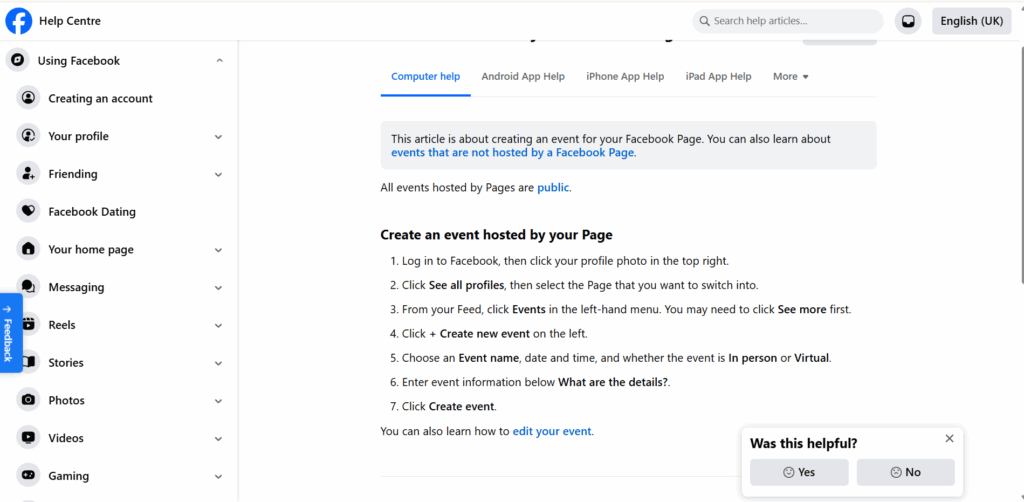
Step 1: Log into Facebook and click Events in the left-hand navigation menu. If you don’t see it, click See more to expand the list.
Step 2: Click the blue Create new event button in the top-left corner.
Step 3: Choose between In person or Online. This changes what fields appear.
Step 4: Fill in the basics:
- Event name (required)
- Start and end date and time
- Location (for in-person) or a link (for online)
- Description
Step 5: Set your privacy. Options are Public, Friends, or Private. Public events are discoverable by anyone on Facebook. Private events are invite-only.
Step 6: Add a cover photo. Facebook recommends 1920 x 1005 pixels. This shows up in the event feed and any shares.
Step 7: Click Create event.
After creation, you’ll land on the event page. From here you can invite guests, edit details, add co-hosts, and enable ticketing.
How to create a Facebook event on mobile (Android and iPhone)
The mobile app event creator has slightly fewer options than desktop, but works well for quick setups.
Step 1: Open the Facebook app and tap the three-line menu (bottom right on iPhone, top right on Android).
Step 2: Scroll down and tap Events, then tap the + button in the top-right corner.
Step 3: Choose In person or Online.
Step 4: Fill in the event name, date, time, and location or link.
Step 5: Add a description and set privacy.
Step 6: Upload a cover photo if you want one.
Step 7: Tap Create event.
One thing to know: the mobile app sometimes shows a simplified event form. If you need access to co-host settings or advanced options, finish the setup on desktop after creating the event.
How to create an event on a Facebook business page
Creating events from a business page is different from a personal profile. The event appears under your page, not your personal account — which matters for brand consistency.
Step 1: Go to your Facebook business page (not your personal profile).
Step 2: Look for the Events tab in the left-hand sidebar of your page, or find it under More if it’s not pinned.
Step 3: Click Create event.
Step 4: Fill in event details the same way as a personal event.
Step 5: Set visibility and add a cover photo.
Step 6: Click Create event.
The event will now show up under your page’s Events section. Followers and visitors can RSVP directly.
A common setup problem: If you don’t see the Events tab on your page, you may need to add it. Go to Settings > Templates and Tabs and toggle Events on.
How to create a Facebook event in a group
Group events work slightly differently because they’re only visible to group members by default.
Step 1: Open the Facebook group.
Step 2: Look for the Events tab in the left sidebar. If it’s not visible, the group admin may need to enable it.
Step 3: Click Create event.
Step 4: Fill in the details and publish.
Group events won’t appear on your personal profile timeline or reach people outside the group. They’re useful for community-specific meetups, member calls, or closed workshops.
How to create a recurring Facebook event
Facebook doesn’t have a native recurring event feature — each event needs to be created separately. But you can use the duplicate event option to speed it up.
After creating your first event, go to the event page, click the three-dot menu (…), and select Duplicate event. This copies all the details so you only need to update the date.
For teams managing multiple recurring events across client pages, this gets tedious fast. Most social media managers who handle events at scale end up working from multiple accounts simultaneously — which means managing multiple Facebook accounts safely becomes part of the workflow.
How to create a Facebook event with multiple dates
Facebook added a multi-date option for events that span several days or have multiple occurrences. When creating an event on desktop:
Step 1: After setting the start date and time, look for the option to add another date or enable multi-session.
Step 2: Add each date separately within the same event.
Step 3: Publish as usual.
Not all accounts see this feature at the same time — Facebook rolls it out gradually by region and account type.
How to find an event you created on Facebook
This trips up a lot of people because Facebook’s Events section isn’t always obvious.
On desktop: click Events in the left menu, then look for Your events > Hosting. All events you’ve created will appear there.
On mobile: tap the menu, go to Events, then scroll to the Your upcoming events section. Tap See all and filter by Hosting.
If the event was created from a business page, you’ll need to go to that page directly and check the Events tab — it won’t appear in your personal hosting list.
How to delete a Facebook event you created
You can only delete events you created. Deleting an event notifies all guests.
On desktop: go to the event page, click the three-dot menu (…), and select Delete event. Confirm the deletion.
On mobile: open the event, tap the three-dot menu, and select Delete.
Note: if the event is from a page, you’ll need to access it through the page, not your personal account.
Running events across multiple Facebook pages: what you need to know
If you’re a social media manager or agency running events for multiple clients, you’re dealing with multiple accounts, multiple pages, and multiple devices. That introduces a real risk: Facebook linking your accounts together because they share the same IP address, browser fingerprint, or login patterns.
When Facebook detects accounts behaving like they come from the same source, it flags them. One ban can cascade across all the accounts sharing that digital footprint.
The practical fix is giving each account its own isolated identity: separate browser profiles, separate IP, separate session data. That’s what tools like Multilogin are built for. Each browser profile gets a unique fingerprint, and you can assign a dedicated proxy per account — so your client’s Facebook page activity never bleeds into another client’s.
If you’re creating and running multiple Facebook accounts professionally, the setup that keeps them from getting linked matters as much as the content you post.
Try Multilogin now to manage multiple Facebook pages and accounts with isolated browser profiles — starting at €5.85/month.
Need to manage multiple Facebook accounts? Try Multilogin Cloud Phones.
Frequently asked questions About How to create an event on Facebook
Open the Facebook app, tap the three-line menu, scroll to Events, then tap the + button. Fill in event name, date, time, location or link, privacy settings, and tap Create event.
Go to your business page (not your personal profile), find the Events tab in the sidebar, and click Create event. The event will appear under your page, not your personal account.
Yes. The mobile app has a slightly simplified form, but you can create complete events on both Android and iPhone. For advanced options like co-hosts, you may want to finish setup on desktop.
After creating the event, click Invite on the event page. You can invite Facebook friends directly, share the event link, or share it to a group or page.
Click Events in the left menu, then go to Your events > Hosting. On mobile, go to Events > Your upcoming events, tap See all, and filter by Hosting.
Open the event, click the three-dot menu, and select Delete event. This will notify all guests. You can’t undo a deletion.
Yes, on desktop you can add multiple sessions to a single event. Look for the add another date option during event creation. Feature availability varies by account.
Conclusion
Creating a Facebook event is quick once you know which account type you’re working from — personal profile, business page, or group. The steps vary slightly across desktop and mobile, but the core inputs are the same.
Where things get more complicated is when you’re managing events across multiple client pages or accounts. That’s when session isolation and proper account management become as important as the event itself. If you’re running Facebook at scale — multiple pages, multiple clients — social media management across accounts needs a proper setup behind it.
Try Multilogin now and manage your Facebook accounts without the linking risk.