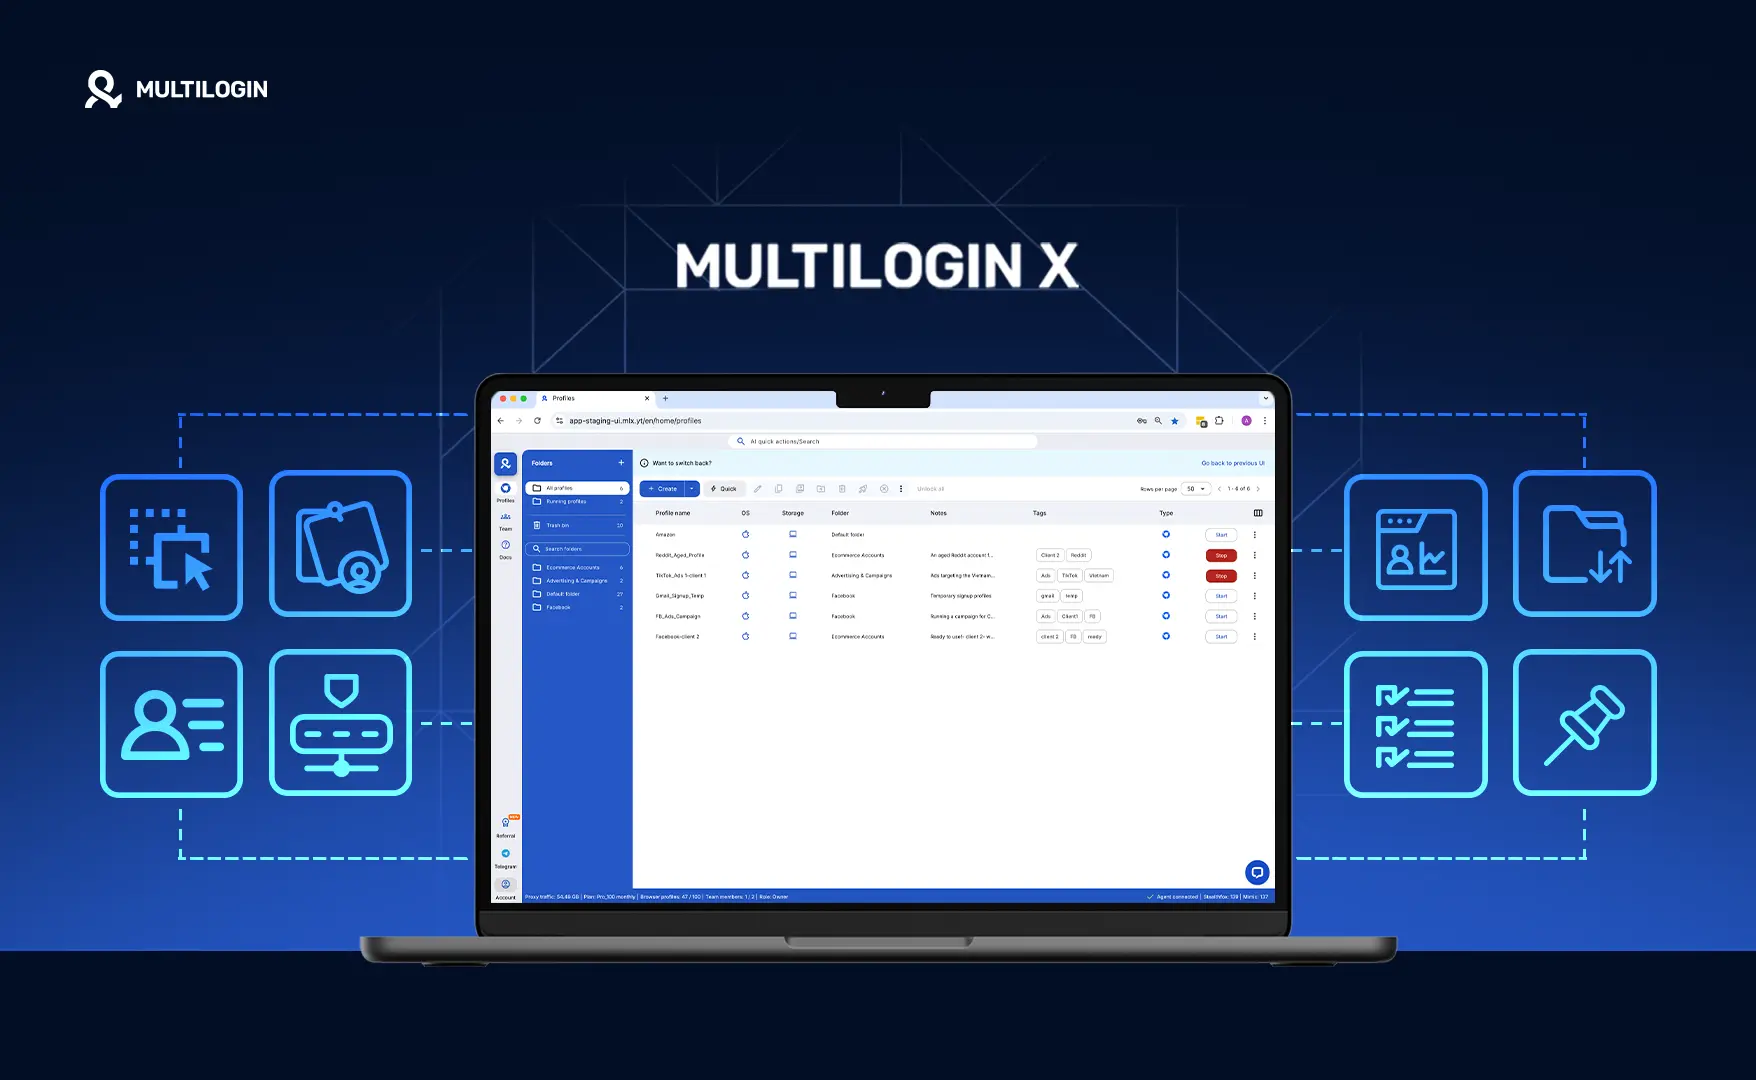
<a href="https://www.livechat.com/chat-with/14893845/" rel="nofollow">Chat with us</a>, powered by<!-- --> <a href="https://www.livechat.com/?welcome" rel="noopener nofollow" target="_blank">LiveChat</a>
The real dynamic use of GatsbyImage with Storyblok Pt. 1: Implementation
Multilogin development

The real dynamic use of GatsbyImage with Storyblok Pt. 1: Implementation

Bogdan Selenginskiy
Web Developer at Multilogin

OCTOBER 12, 2023

Suppose you're knee-deep in a Gatsby and Storyblok project like we are. In that case, you've probably noticed your blog posts multiplying—along with a growing number of images in older formats like .jpeg and .png instead of the more efficient webp. It's the price of growth but a problem that needs solving.

As your website grows, a need to optimize it arises by itself. It is not enough to 'feel something is off' or 'it seems to be loading kinda slow'; you need a proper measurement tool.

Before raising any hopes here, we failed and picked Lighthouse, as we did not research enough and relied on its measurements.

When implementing the Gatsby-image-plugin, we knew Lighthouse's problems; we did not realize it would be so bad. We removed all its warnings and got a worse result than at the beginning.

Setting aside the measurement, we also fell for Gatsby's advertising of their plugin:

Adding responsive images to your site while maintaining high performance scores can be difficult to do manually. The Gatsby Image plugin handles the hard parts of producing images in multiple sizes and formats for you!

You can read more here and here. It was decided to give it a shot. Despite the problems the plugin brought into the project, we choose to leave it because, from the technical point of view, it is a better solution, which leads to a slighter, worse experience.

Implementation

Should you choose the Gatsby-image-plugin, we present a guide with some tips. We also assume you have installed all needed dependencies from the official guide so that we can concentrate on the actual dynamic usage of the plugin.


Get your image data

Previously, we used to rely on simple URL, which was provided by Storyblok, among other fields.

To use GatsbyImage, we need to preload the image from this link and form the imageData dynamically. The first problem you run into reading the docs is that they assume you would query images with GraphQL on every page:

More than that, you also need to know the particular field name for every image, making it nearly impossible to use the plugin without extra complexity and repetitions. So, there should be a way to query all photos and put them where they belong.

Let's start with the first step and try to retrieve all imageData objects. By trial and error, we have discovered the allFIle thing in the GraphQL interactive view ( http://localhost:8000/___graphql ), which contained the childImageSharp with the desired gatsbyImageData.

Every URL here is the same as we had before passed directly from Storyblok. When we have the array of imageData, we need to query it within the gatsby-node.js

Pass your image data to the component

We are continuing to work on the Gatsby-node.js file. Since we have the whole collection of images (there is a problem, though, see here, But an attentive reader would already know the catch), we need to make them accessible all over the app without repeating ourselves, but at the same time provide components only with the images they have.

Let's add the images property to our createPage() function.

Create a context to wrap your top-level component

Finally, we need to add new prop images and create a context, which we read to access all the photos. Passing the new prop (images) to every component with an idea would prove almost impossible.

Thus, we utilize the Context API on the top-level component, which passes all the retrieved data from Storyblok to our pages; it is dynamicComponent.js.

We wrap the template in a context provider to enable reading the images through context, passing the images as the value.

Reuse and refactor the original image component.

Depending on your current implementation of images in the project, it would be wise to use it unless it is somehow flawed and you want to refactor it. It will ensure preserving the current workflow and be less error-prone during refactoring.

We had a <StoryblokImage/> component everywhere. So, we added the images we passed with Context API;

Let's add some context to this screenshot. First, we need to demonstrate the StoryblokImageType; it is the structure we get along with other fields from Storyblok. Look at our previous implementation with the <img> tag (lines 23-29).

Okay, we can access all images; how would we render the right one?

The answer is in the getGatsbyImageDataByUrl() function, which accepts the whole image array and the file path (from Storyblok) we used previously.

And here you are, using the cool GatsbyImage dynamically!

To make sure of it, look at the source of your page; there are no <img> tags anymore but the <picture> tags.

Conclusion

To use gatsby-image-plugin truly dynamically, you need to follow these steps:

  1. Install dependencies and add the plugins to your gatsby-config.js (see the official docs)

  2. query images in gatsby-node.js with all file and add them to create pages() as a prop

  3. Use Context API on your top-level component to access images anywhere

  4. Please find a way to pick the needed image from the array (we used the find() function and image URL as the search criteria)

  5. display your images with <GatsbyImage/>

  6. check if the <picture> is rendered instead of <img>

Even though it is working, there are a bunch of issues that are out of the scope of this article (some of them are visible in screenshots of the code). We will address them in a separate publication.

Share this post