


Posting from a phone is convenient until your photos, videos, captions, and client files are all stored on a computer. Moving every asset to a phone adds extra steps. Switching among several Instagram profiles makes the process even harder to track.
You can post on Instagram from a computer through Instagram’s website. The basic method works on both PC and Mac, but Stories, Reels, scheduling, and mobile editing tools may require different workflows.
Instructions checked in September 2026. Instagram may change the names or positions of interface controls.
Quick answer
To post on Instagram from a computer, open Instagram.com, sign in, select Create, upload your photo or video, complete the post details, and select Share. You do not need to change your browser settings for a standard feed post.
Key takeaways
- Instagram’s website lets users publish prepared photos and videos from a PC or Mac.
- The native browser uploader is the simplest option for a standard feed post.
- A prepared Reel can be uploaded from a computer, but desktop editing is more limited than mobile editing.
- Story publishing is not consistently available through Instagram’s standard desktop workflow.
- Meta Business Suite can schedule supported content when the required option is available for the selected profile.
- Browser profiles suit separate web sessions, while Android cloud phones suit Instagram app workflows.
How to post on Instagram from a computer
To post on Instagram from a computer, sign in through Instagram’s website and use the native Create tool.
The basic process is documented in the approved desktop guides from Sprout Social and Manychat.
- Open a current browser on your PC or Mac.
- Go to Instagram.com.
- Sign in to the Instagram profile you want to use.
- Select Create in the navigation menu.
- Select Post if Instagram displays a choice of content types.
- Drag a photo or video into the upload window, or choose Select from computer.
- Review the available crop and display options.
- Apply any filters or adjustments you want to use.
- Add a caption and any other available post details.
- Check the active Instagram profile.
- Select Share.
The exact labels may vary as Instagram changes its interface. The process should still follow the same basic order: choose the active profile, open the creation tool, upload the media, complete the post, and share it.
Developer Tools are not required for this standard method. Many older search results recommend changing the browser viewport to display a mobile-style page, but Instagram now provides a native web uploader for ordinary posts.
How do you post photos on Instagram from a computer?
You post photos from a computer by selecting them through Instagram’s Create window.
Desktop uploading is useful when the final files are already stored on your computer. You can publish them without first sending them to a phone.
Posting one photo
Choose an image in the upload window, review the available crop and adjustment controls, and continue to the post-details screen.
Before publishing, check:
- The active Instagram profile
- The selected image
- The crop and orientation
- The caption
- The tags and location, if used
- The accessibility options, if shown
Select Share after confirming that the file and profile are correct.
Posting multiple photos
You may be able to post multiple photos from a computer by using the multiple-media control in the upload window.
If that control appears, select the files, arrange them in the intended order, and preview each item. Available controls can change, so check the current interface before preparing a carousel-only desktop workflow.
If the multiple-media option is not available, use the Instagram mobile app or another supported publishing method.
How do you post videos and Reels on Instagram from a computer?
You can upload a prepared video or Reel from a computer, but the desktop workflow provides fewer creation tools than the Instagram mobile app.
The approved Shopify desktop guide covers uploading Reel content from a computer. Manychat also reports that desktop Reel editing is more limited than editing in the app.
To upload a prepared video:
- Open Instagram.com and select Create.
- Select the video stored on your computer.
- Review the available crop and format controls.
- Choose a cover image if Instagram provides that option.
- Add the caption and other available details.
- Confirm the active profile.
- Select Share.
Uploading a finished video is different from creating a Reel inside the mobile app. Desktop users may have less access to music, effects, stickers, transitions, or multi-clip editing.
Prepare the finished media before uploading from a computer. Use the mobile app when the content depends on Instagram’s native mobile creation tools.
Can you post an Instagram Story from a computer?
Instagram does not provide a consistent native Story-publishing workflow through its standard desktop interface for every profile.
Current search results conflict because they describe several different methods.
Mailchimp and Manychat describe Stories as unavailable through the ordinary desktop uploader. Shopify describes a Developer Tools method with limited creative controls. Brandwatch and Sprout Social describe workflows that depend on their own publishing products or a mobile handoff.
These approaches are not interchangeable:
- The standard Instagram desktop uploader is the native browser method.
- Developer Tools can change how the webpage is displayed, but they do not reproduce the complete Instagram app.
- A publishing platform may support prepared Story content for some profiles and formats.
- The mobile app provides access to Instagram’s native Story creation experience.
Use the Instagram app when your Story needs music, stickers, polls, effects, or other mobile creation controls. If you only need to publish prepared Story media, check whether the required Story option appears in Meta Business Suite or your approved publishing platform.
How do you schedule an Instagram post from a computer?
You can schedule supported Instagram content from a computer through Meta Business Suite or a compatible scheduling platform.
Meta’s scheduling guidance describes selecting Schedule Post and setting the publication date and time.
A typical workflow is:
- Open Meta Business Suite.
- Select the connected profile you want to manage.
- Create the post.
- Review the destination and post details.
- Choose the scheduling control instead of immediate publication.
- Select the date and time.
- Confirm the schedule.
Check the available options inside Meta Business Suite before planning the campaign. Supported profiles, content types, and controls can change.
A scheduling platform is useful when the problem is timing and calendar management. It does not replace the Instagram app when the content requires native mobile creation tools.
What is different between Instagram desktop and mobile?
Instagram desktop is best suited to uploading prepared files and completing web-based tasks, while the mobile app provides a broader creation experience.
Task | Desktop workflow | Mobile app workflow |
Publish a prepared feed photo | Use Instagram’s web uploader | Use the Instagram app |
Publish a prepared video | Use Instagram’s web uploader | Use the Instagram app |
Create a carousel | Use the multiple-media control if available | Use the Instagram app |
Upload a prepared Reel | Available with fewer creation controls | Available with broader creation controls |
Create a Story | Not consistently available through the standard web workflow | Use the Instagram app |
Add mobile music or effects | Limited | Broader access |
Use interactive Story tools | Limited or unavailable | Available where Instagram provides them |
Write and review a long caption | Convenient with a full keyboard | Available on mobile |
Work with computer-based files | Upload them directly | Transfer or make the files available to the phone |
Schedule content | Use Meta Business Suite or another supported platform | Depends on the selected publishing method |
Treat this table as a workflow guide. Instagram can add, remove, or relocate individual controls.
Which Instagram publishing method should you use?
Choose the Instagram publishing method according to the content type, timing, and environment the task requires.
Situation | Best-fit method | Reason |
Publish one prepared photo or video now | Instagram website | It provides a direct native upload workflow. |
Publish content at a later time | Meta Business Suite or a compatible scheduler | These tools are designed for planned publishing. |
Create a Story or Reel with mobile tools | Instagram mobile app | The app provides broader creation controls. |
Manage one profile through the web | Normal browser session | A simple workflow may not require another environment. |
Keep several web logins in separate sessions | Separate browser profiles | Each profile can keep its own web cookies and session. |
Work with several Instagram Android app profiles | Separate Android cloud phones | Each social profile can use its own mobile app environment. |
The method should match the problem. A scheduler manages timing. A browser supports direct web publishing. A mobile environment supports app-based creation.
How can teams organize several Instagram profiles across desktop and mobile?
Teams can organize several Instagram profiles by assigning each one a consistent web or mobile environment and recording who is responsible for it.
A browser profile fits Instagram web work because it keeps the profile’s cookies and session in its own environment. An Android cloud phone fits Instagram app work because it runs the Android application in a dedicated mobile environment.
Multilogin places browser profiles and Android cloud phones in one workspace. A team can use a browser profile for Instagram web tasks and an Android cloud phone for mobile app tasks without treating the two environments as the same product type.
A practical workflow is:
- Assign a clear name to each client or brand profile.
- Use a browser profile when the task can be completed through Instagram’s website.
- Use an Android cloud phone when the task requires the Instagram app.
- Add custom columns, color tags, or notes to record useful operational details.
- Keep approvals and publishing dates in the team’s existing content calendar.
- Confirm the selected social profile before publishing.
Multilogin is a cloud phone platform for social media marketers, not an Instagram scheduler. Its role in this workflow is to help teams organize separate web sessions and mobile app environments. Teams that require app-based work can review Android cloud phones for social media.
For creator teams managing multiple brand or client profiles, Multilogin can help keep daily account work organized without turning your analytics workflow into a login mess.
Multilogin is not a way around platform rules; the safest approach combines clean account separation with original content, real engagement, and platform-compliant activity.
Common Instagram desktop posting problems
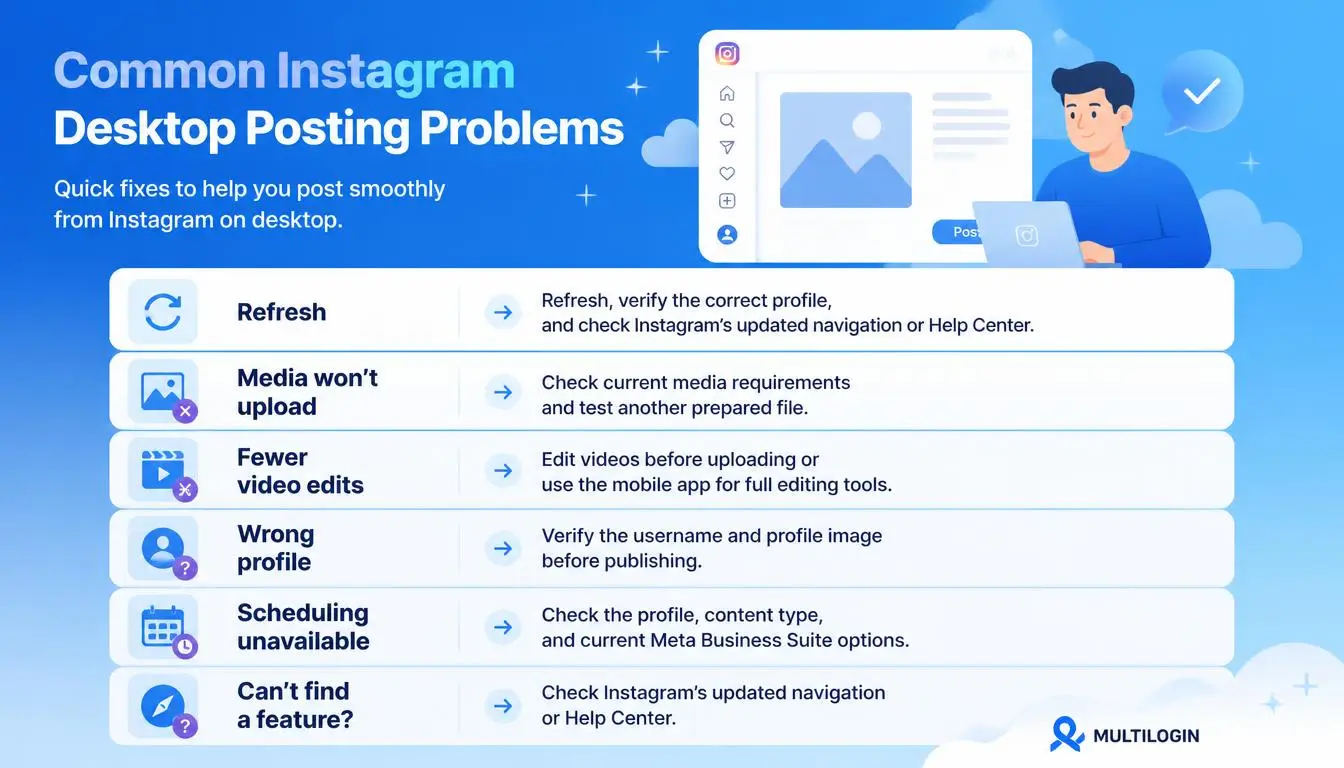
Most Instagram desktop problems involve the active profile, the selected media, an unavailable publishing option, or a changed interface.
The Create control is missing
If the Create control is missing, refresh the page and confirm that you are signed in to the intended Instagram profile.
Instagram sometimes changes where navigation controls appear. Check the main navigation and any available creation menus. Visit the Instagram Help Center if the control remains unavailable.
The media will not upload
If the media will not upload, check Instagram’s current media requirements and confirm that you selected the intended file.
Try another prepared file to determine whether the problem affects one asset or the whole upload workflow. Use Instagram Help for current format and upload requirements rather than relying on an old third-party limit.
The video has fewer editing controls
If the video has fewer editing controls, finish the detailed edits before uploading or use the Instagram mobile app.
The desktop uploader is designed primarily for prepared media. It does not provide the complete mobile creation experience.
The wrong Instagram profile is open
If the wrong profile is open, stop before publishing and sign in to the intended profile.
Always check the username and profile image before selecting Share. Teams managing several clients should also use clear profile names and ownership records.
The scheduling option is unavailable
If the scheduling option is unavailable, check the connected profile, selected content type, and current controls in Meta Business Suite.
Do not assume that every format has the same scheduling workflow. Use the immediate desktop uploader or mobile app if the required scheduling option is not provided.
Five best practices for posting on Instagram from a computer
1. Confirm the profile before uploading
Check the Instagram username before selecting a file and again before choosing Share. This short check is useful when several client or brand profiles are active.
2. Prepare the final media first
Complete detailed video edits, text placement, audio decisions, and graphic work before opening the desktop uploader. The browser provides fewer creation tools than the mobile app.
3. Preview every crop
Review how each photo, video, or carousel item appears in the selected format. Check each item separately before publishing.
4. Separate immediate publishing from scheduling
Use Instagram’s web uploader for content you want to publish now. Use Meta Business Suite or a compatible scheduler when the task depends on a future date and time.
5. Document the publishing workflow
Record the client, active profile, content owner, approval status, and planned publication time. A written record makes team handoffs easier to follow.
Conclusion
Posting on Instagram from a computer is straightforward when the media is already prepared. The native web uploader is the right starting point for standard photos and videos on both PC and Mac.
Use desktop for prepared files, a scheduling platform for planned publishing, and the mobile app for native creation tools. When several profiles are involved, keep each session clearly identified and document the publishing process.