Managing browser profiles at scale often involves more than simply creating a profile and opening a browser. Teams may also need to organize workspaces, create folders and tags, apply consistent browser settings, manage proxies, and connect profile creation with other business processes. This is where workflow automation can make Multilogin management more efficient.
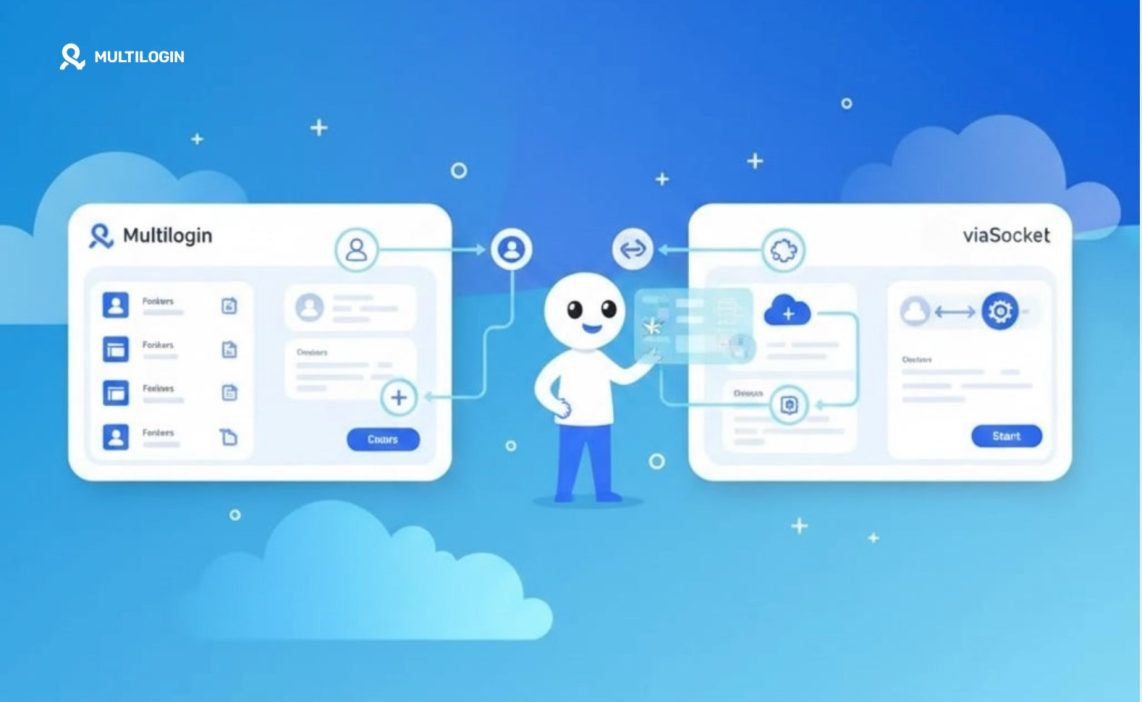
Multilogin integrates with viaSocket, an automation platform that allows different applications and actions to be connected inside a single workflow. By connecting Multilogin with viaSocket, teams can automate selected profile management tasks while continuing to use Multilogin as the environment for browser profile creation, fingerprint configuration, workspace organization, and proxy-based operations.
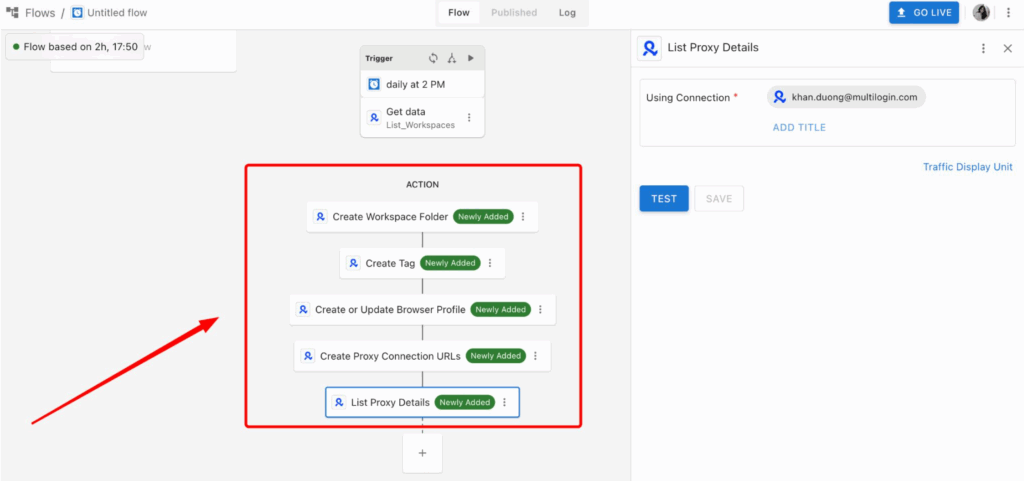
The Multilogin integration supports a broader set of actions, including List Workspaces, List Workspace Folders, Search Profiles, Create Workspace Folder, Create Tag, Create or Update Browser Profile, Create Proxy Connection URLs, List Proxy Details, and profile deletion. A production workflow can therefore become considerably more advanced depending on the use case.
For a first test, however, it is better to start with a simple workflow that clearly demonstrates how the connection works:
List Workspaces → Create Workspace Folder → Create Tag → Create or Update Browser Profile
This basic flow shows both sides of the integration: viaSocket can first retrieve data from Multilogin and then send actions back to Multilogin to create real resources.
How to Connect Multilogin with viaSocket and Build a Basic Automation Workflow
Step 1: Create a viaSocket account and connect it to Multilogin
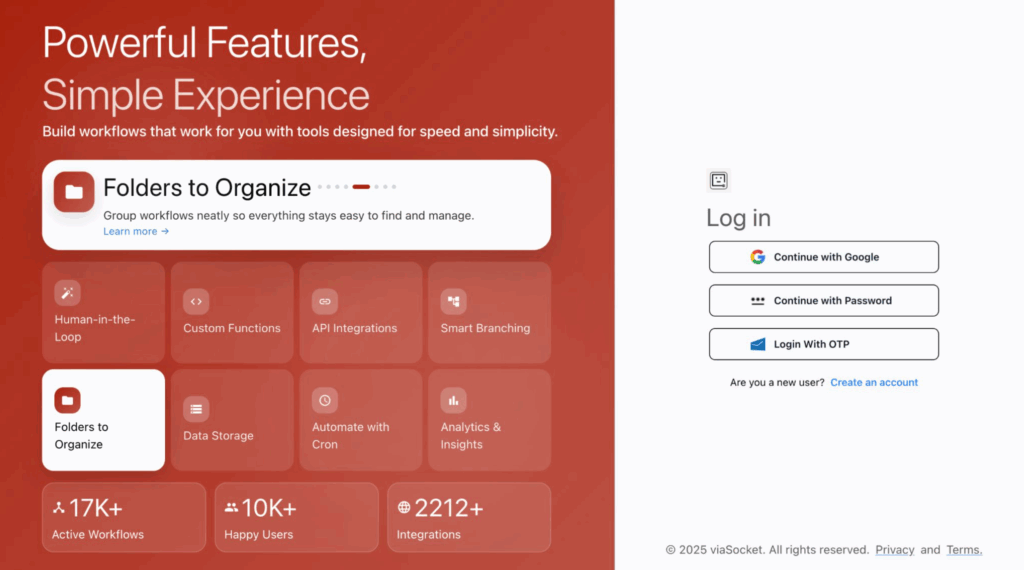
Before building the automation, create an account on viaSocket and log in to the viaSocket dashboard. A Multilogin account is also required because viaSocket needs permission to access the Multilogin workspace and perform the actions included in the workflow.
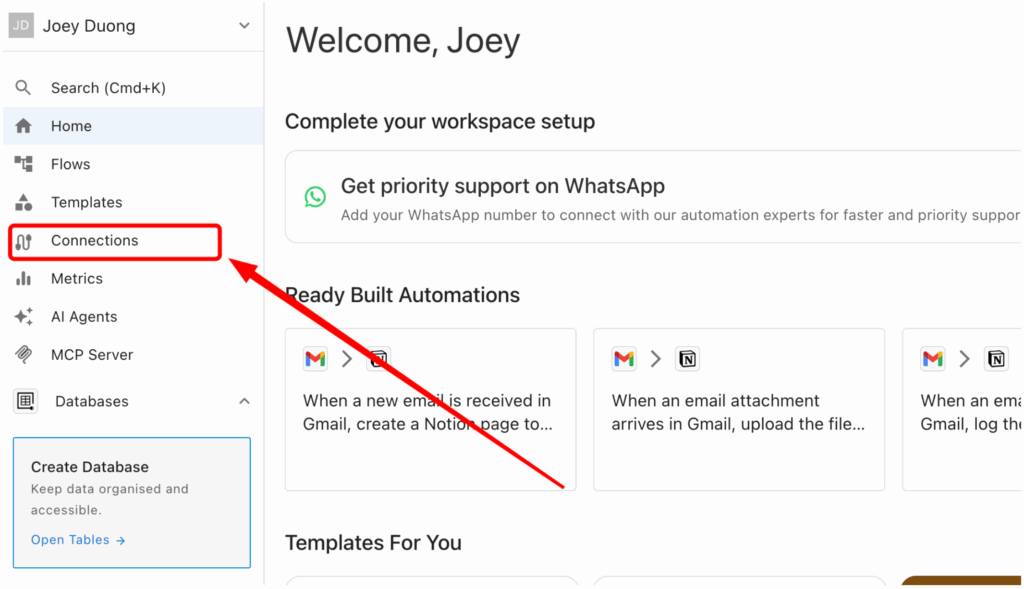
Open the viaSocket dashboard, click Connections to open the integration settings:
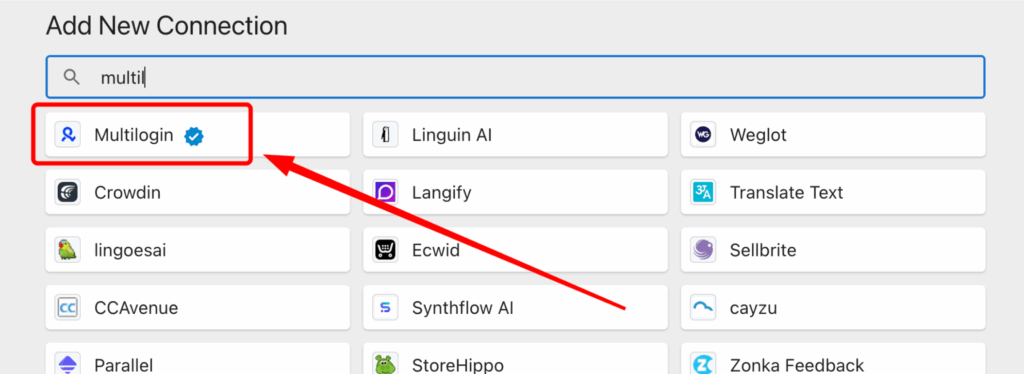
Click Create New Connection to add a new app connection

Use the search bar to find Multilogin, then select Multilogin from the available integrations.
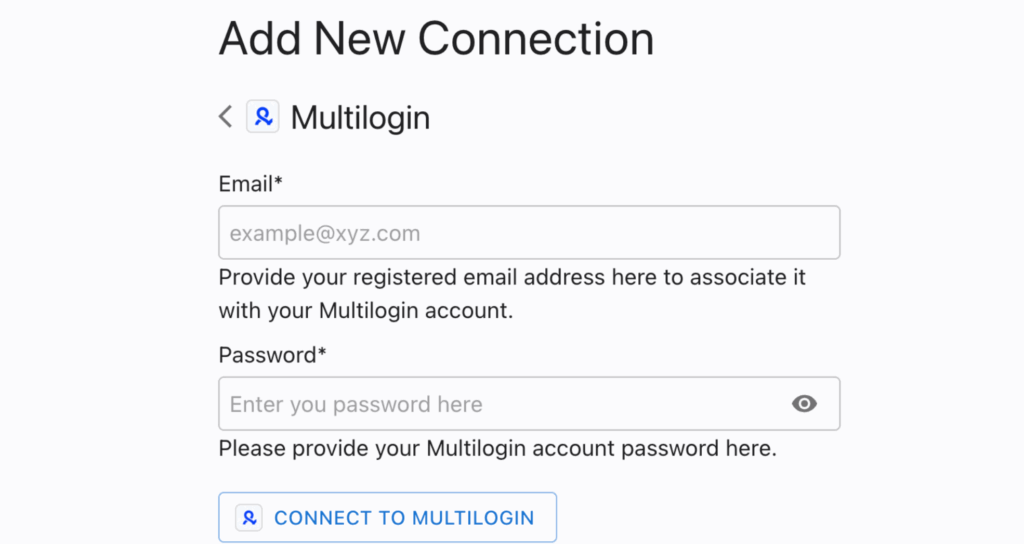
Log in to your Multilogin account and complete the authorization process. Once connected, viaSocket can use your Multilogin account in the workflow actions.
For this basic workflow, the connection will be tested first with a read-only action before any folders, tags, or browser profiles are created.
Step 2: Create a new flow and use list workspaces as the starting point
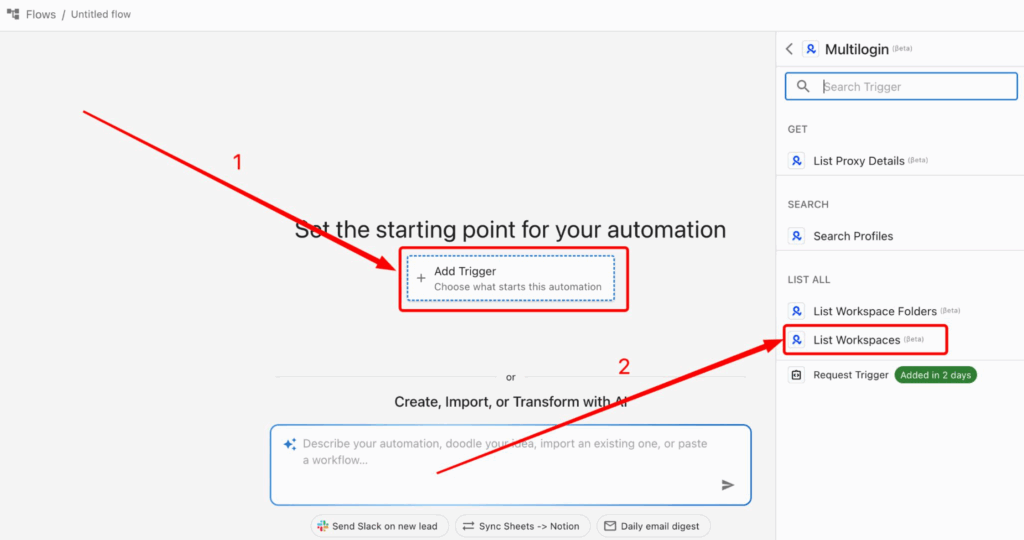
From the viaSocket dashboard, create a New Flow. On the flow builder screen, click Add Trigger, search for Multilogin, and select List Workspaces.
viaSocket will create the initial trigger structure with a scheduling block and a Get data – List_Workspaces operation. Using List Workspaces as the first Multilogin operation is useful because it allows the integration to be tested without modifying anything inside the Multilogin account.
Step 3: Configure the workflow schedule
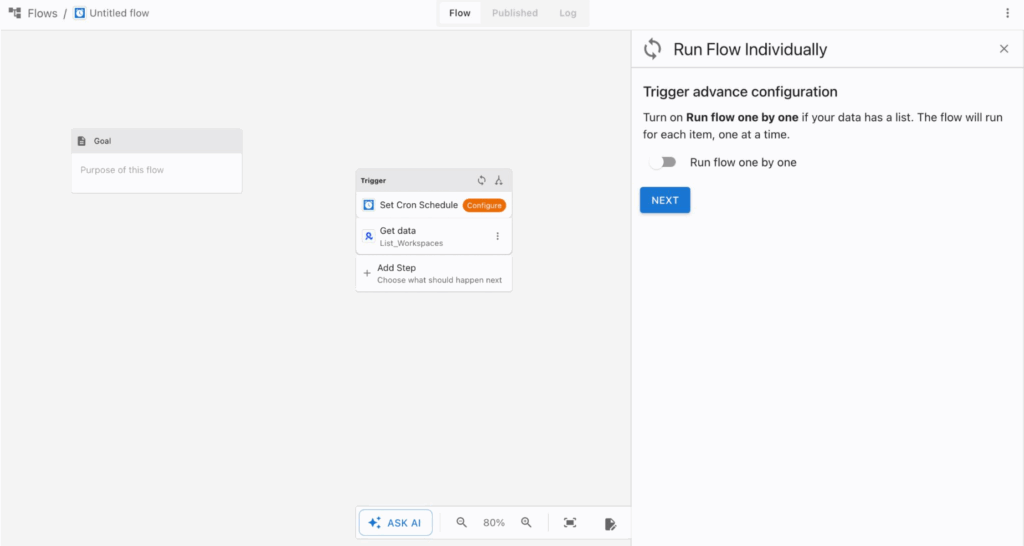
Inside the trigger block, click Configure next to the Cron Schedule. For a basic test, the schedule can be set to Daily at 2 PM.
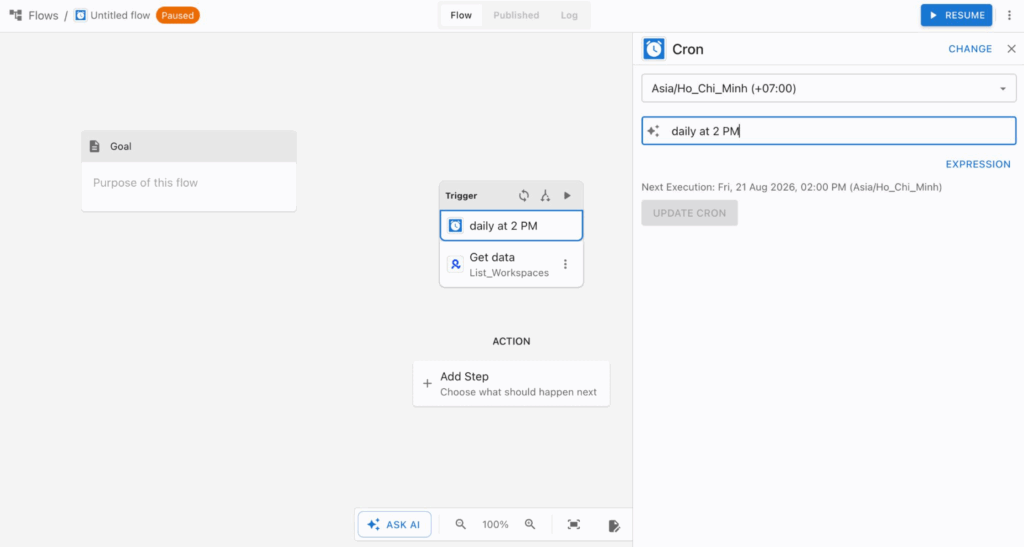
The Cron Schedule determines when viaSocket will automatically start the workflow. The exact time used during testing is not important; it simply gives the flow a defined starting condition. In a real automation, the schedule can later be adjusted according to operational needs.
For example, a team could run a Multilogin-related workflow once per day, several times per day, or according to another trigger supported by the automation setup.
After saving the configuration, the trigger should display daily at 2 PM.
There is no need to activate the complete automation yet. The individual Multilogin operations can first be tested manually to make sure each connection and configuration works as expected.
Step 4: Test the Multilogin connection with list workspaces
Open the Get data – List_Workspaces block. Under Using Connection, select the Multilogin account connected in Step 1. In How Do You Want to Fetch Workspaces?, select All Workspaces, then click TEST.
viaSocket will send a request to Multilogin and display the returned data in the Response section. If the connection is working correctly, the response should contain information about the Multilogin workspaces available to the account.
The response may include technical fields such as workspace_id, name, role, and mfa_enabled.
For example, viaSocket may return multiple workspace objects together with a total_count value. The exact response depends on the Multilogin account and the number of workspaces available.
A successful result confirms that viaSocket can retrieve data from Multilogin through the connected account. This is the first key checkpoint in the workflow.
Once List Workspaces works correctly, the automation can move from read-only requests to actions that create resources in Multilogin.
Step 5: Create a workspace folder in Multilogin
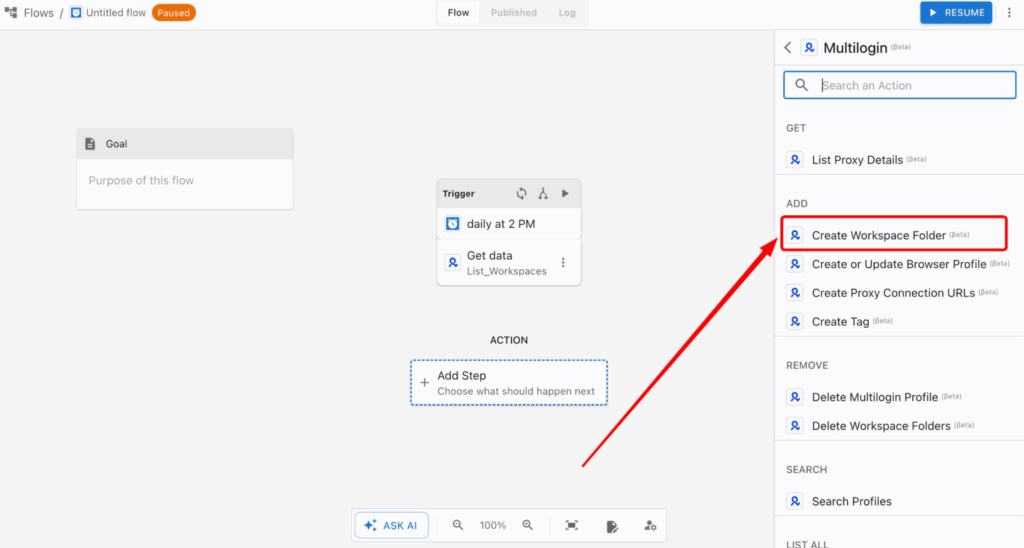
Click Add Step below the trigger, search for Multilogin, and select Create Workspace Folder.
In the configuration panel, keep the existing Multilogin account under Using Connection. Enter Folder Name: viaSocket Test Folder. A description can also be added under Folder Comment, for example Created via viaSocket integration test. Strict Mode can remain in its default state for this basic test.
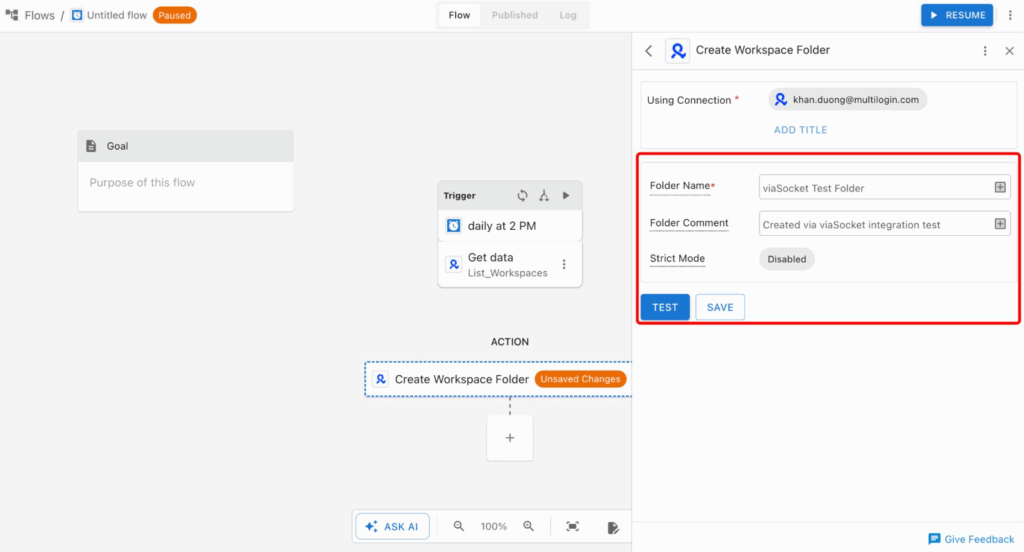
Once the fields are ready, click TEST.
Unlike List Workspaces, this is a write action. Testing the action therefore sends a real request to Multilogin and creates the folder inside the current workspace.
If the request succeeds, the Response section should return an id for the newly created folder. This ID confirms that the resource was created successfully.
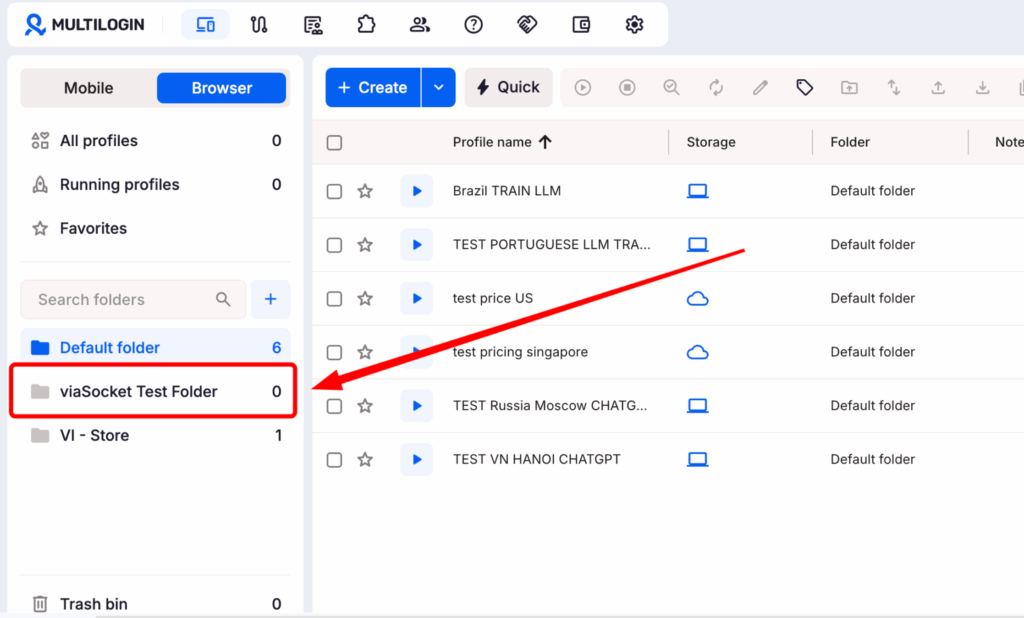
Click SAVE to keep the action in the workflow, then open Multilogin and check the workspace. The new viaSocket Test Folder should now be visible.
Step 6: Create a tag for Multilogin profile organization
Click the + icon below Create Workspace Folder, search for Multilogin, and select Create Tag.
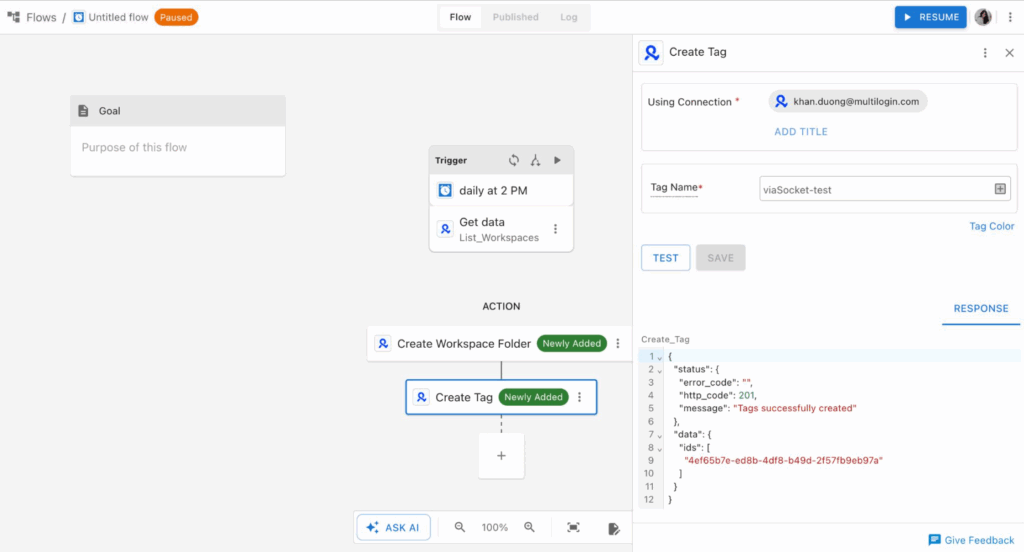
Open the action configuration and keep the same Multilogin account under Using Connection. Enter Tag Name: viaSocket-test. A Tag Color can also be selected if needed, although this is optional and can be left at its default value during testing.
Click TEST to create the tag. If the tag is created successfully, save the action by clicking SAVE.
One detail is worth noting when testing this action repeatedly. If viaSocket-test has already been created during a previous test, Multilogin may return a 409 response with an error such as TAG_ALREADY_EXISTS. This does not mean the Multilogin connection has failed. It simply means that a tag with that name already exists in the account.
For a production workflow, duplicate handling can be added so the automation does not repeatedly attempt to create the same static tag. For the purpose of this initial integration test, the action is useful for confirming that viaSocket can also perform organizational tasks inside Multilogin.
The flow should now look like: List Workspaces → Create Workspace Folder → Create Tag
Step 7: Create a Multilogin browser profile from viaSocket
Click the + icon below Create Tag, search for Multilogin, and select Create or Update Browser Profile.
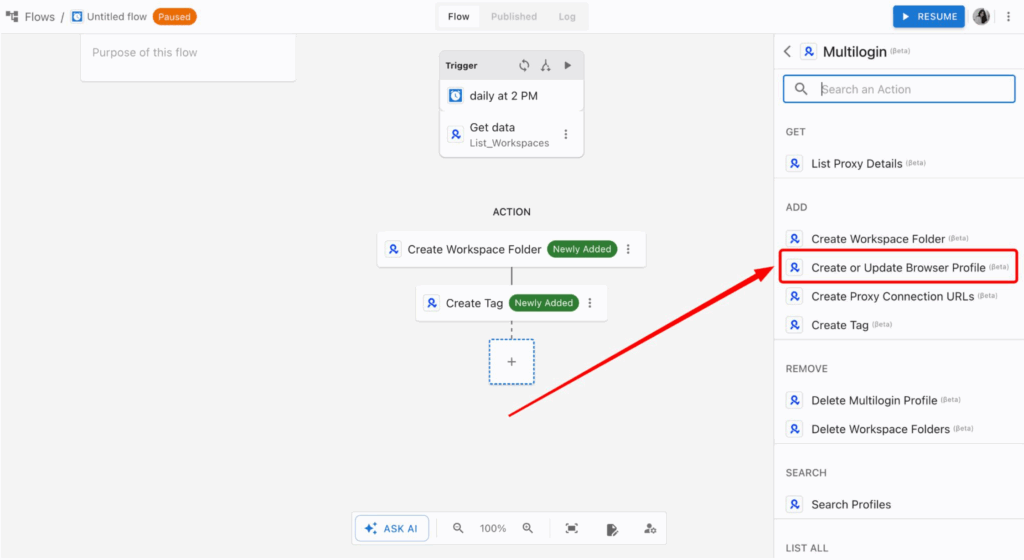
This is the most important action in the basic workflow because it demonstrates how a viaSocket automation can create an actual Multilogin browser profile.
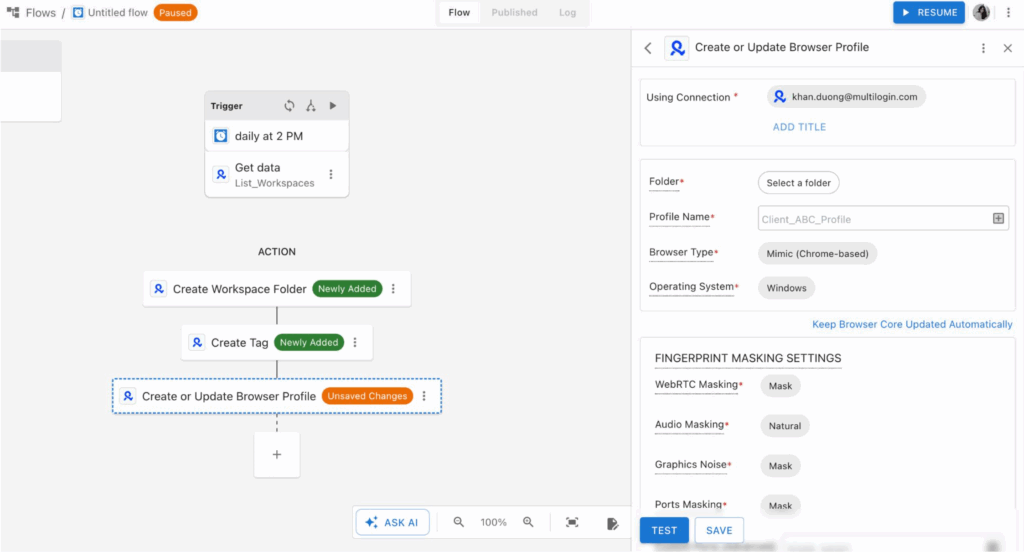
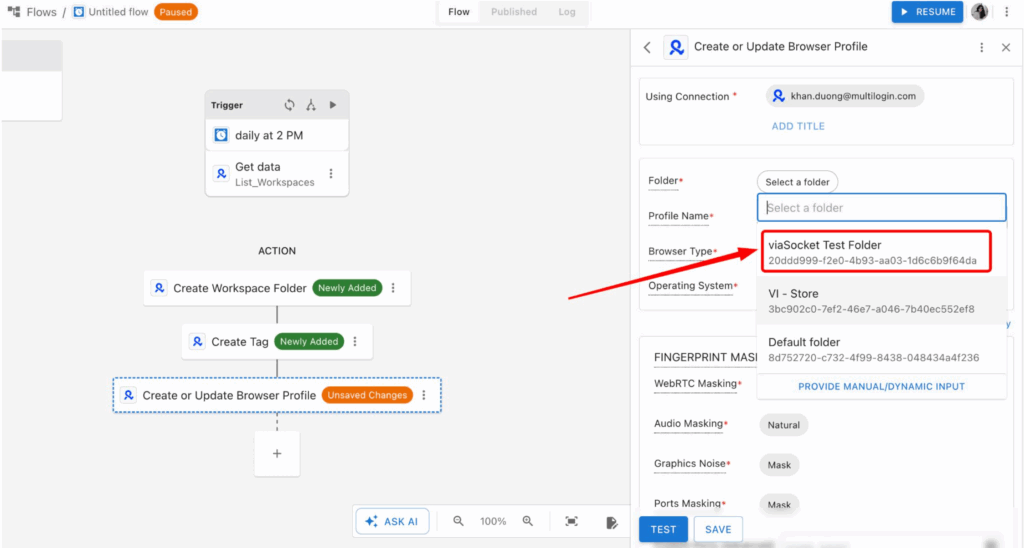
In the configuration panel, keep the existing Multilogin account under Using Connection. For the folder, select Folder: viaSocket Test Folder. Enter Profile Name: viaSocket Test Profile, keep Browser Type: Mimic (Chrome-based), and set Operating System: Windows.
The action also exposes Multilogin browser fingerprint configuration settings. These can include WebRTC Masking, Audio Masking, Graphics Noise, Ports Masking, Fonts Masking, Media Devices Masking, Screen Masking, Geolocation Masking, and Canvas Noise.
For a basic connection test, these settings do not need to be customized. Keeping the default values makes it easier to focus on whether the automation itself is working correctly.
The same approach can be used for the remaining settings. Options such as QUIC Mode, Startup Behavior, Store Profile Locally, and Save Service Worker Data can remain at their default values unless the workflow requires a specific configuration.
A simple test configuration can therefore use Mimic, Windows, the default fingerprint masking settings, Store Profile Locally: No, and Save Service Worker Data: Yes.
After confirming the required fields, click TEST. viaSocket will send the browser profile creation request to Multilogin. If the request is successful, viaSocket Test Profile will be created inside viaSocket Test Folder.
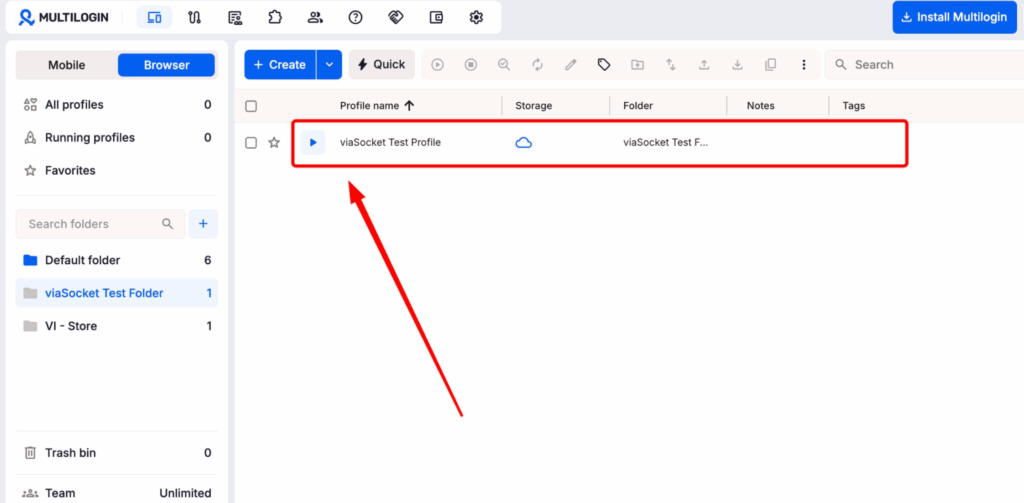
Once the test succeeds, click SAVE. The complete basic automation now looks like: List Workspaces → Create Workspace Folder → Create Tag → Create or Update Browser Profile
Multilogin cloud phone for mobile-first account management
Multilogin also goes beyond browser profiles with Multilogin Cloud Phone, bringing browser and mobile account management into the same platform. Cloud Phones provide cloud-based Android environments for workflows that depend more heavily on mobile apps, while Multilogin Browser remains suited to browser-based account operations.
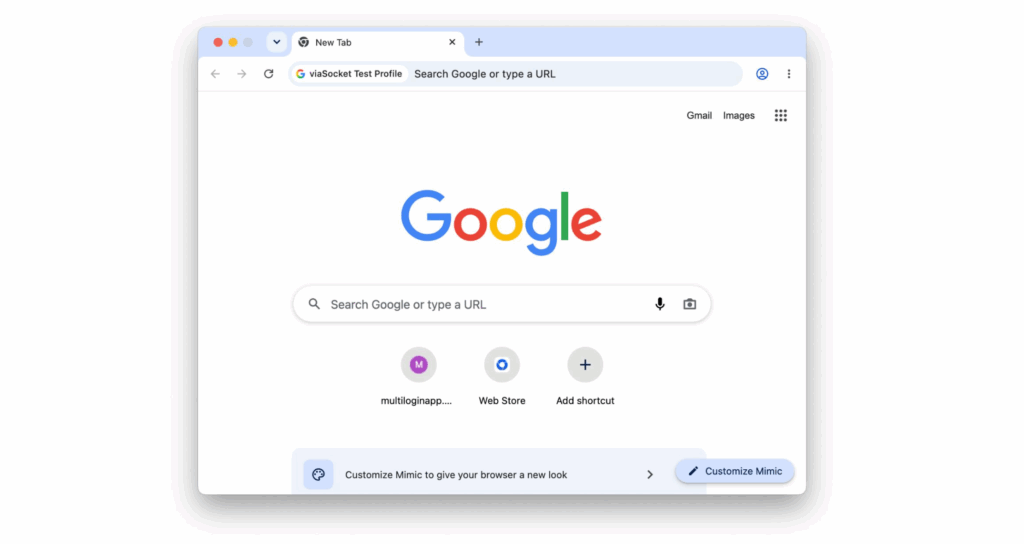
The viaSocket workflow demonstrated in this guide specifically automates Multilogin browser profile creation, but Multilogin cloud phone gives users another option when their operation also includes mobile-first accounts. Together, Multilogin browser and cloud phone make it possible to manage both browser and mobile environments from one Multilogin ecosystem while automation helps reduce repetitive work as the operation scales.
=> Ready to streamline your browser and mobile account workflows? Try Multilogin for free and start building a more scalable setup today.