


LinkedIn Sales Navigator is a prospecting tool built for B2B sales teams that need to find the right decision-makers faster and turn LinkedIn into a more structured lead generation channel. In this guide, you’ll learn how LinkedIn Sales Navigator works, how to use its advanced filters, lead lists, recommendations, and InMail, and how to build a more efficient prospecting workflow.
Unlike standard LinkedIn search, Sales Navigator gives you deeper targeting options based on role, company size, industry, location, and other buying signals. That makes it easier to identify high-value prospects without wasting hours scrolling through broad search results.
Finding leads, however, is only one part of the process. If your team manages multiple LinkedIn accounts or runs outreach at scale, Multilogin cloud phones can support a more organized multi-account workflow by keeping account environments separate and easier to manage.
👉 Want to get more value from LinkedIn Sales Navigator? Start with the strategies in this guide and explore how Multilogin can support your prospecting workflow.
What Is LinkedIn Sales Navigator, Exactly?
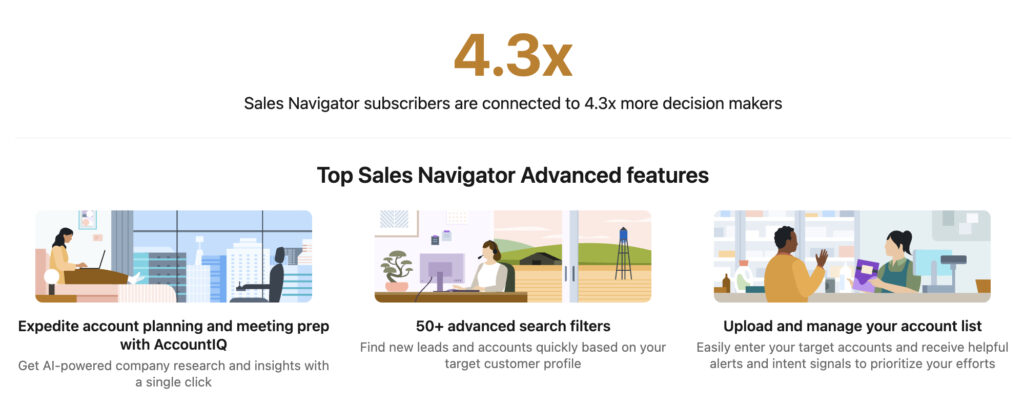
LinkedIn Sales Navigator is a premium subscription tier of LinkedIn designed for sales professionals who need to prospect at scale. Regular LinkedIn search shows you a handful of filters and caps how many results you can even scroll through. Sales Navigator removes most of those limits and adds dozens of filters you simply don’t get otherwise.
Think of it this way: free LinkedIn is a filing cabinet with a few labeled folders. Sales Navigator is that same cabinet, except now every folder is cross-referenced, searchable by twenty different tags, and someone’s already flagged the people most likely to actually respond to you. That’s the shift.
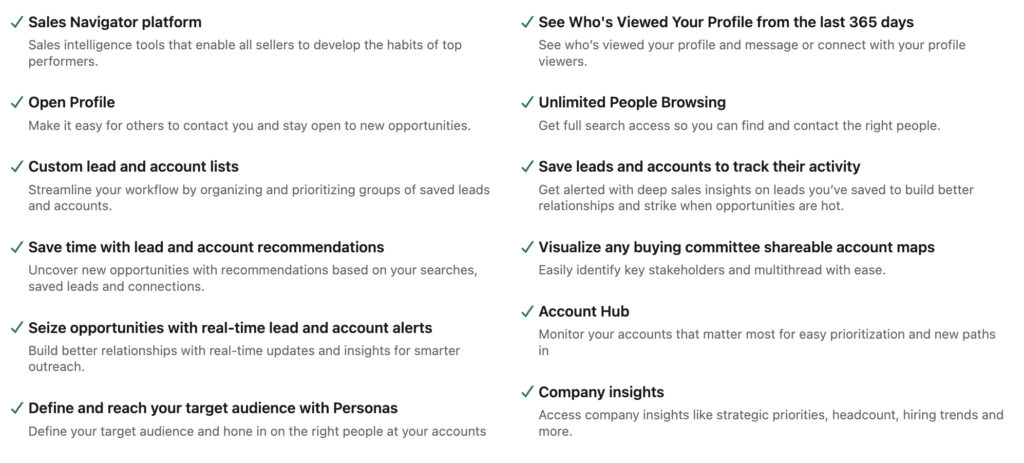
It comes in a few tiers (Core, Advanced, and Advanced Plus), each unlocking more seats, more integrations, and deeper CRM syncing. Most solo reps and small teams start with Core and upgrade once they hit its limits.
Sales Navigator isn’t a CRM replacement. It’s a prospecting layer that usually feeds into your CRM, not a substitute for one.
How to Open LinkedIn Sales Navigator
Opening LinkedIn Sales Navigator is straightforward once you have an active subscription. You can access it directly from LinkedIn or through the dedicated Sales Navigator page.
Here’s how to open LinkedIn Sales Navigator:
- Log in to your LinkedIn account.
- Click the For Business menu in the top navigation.
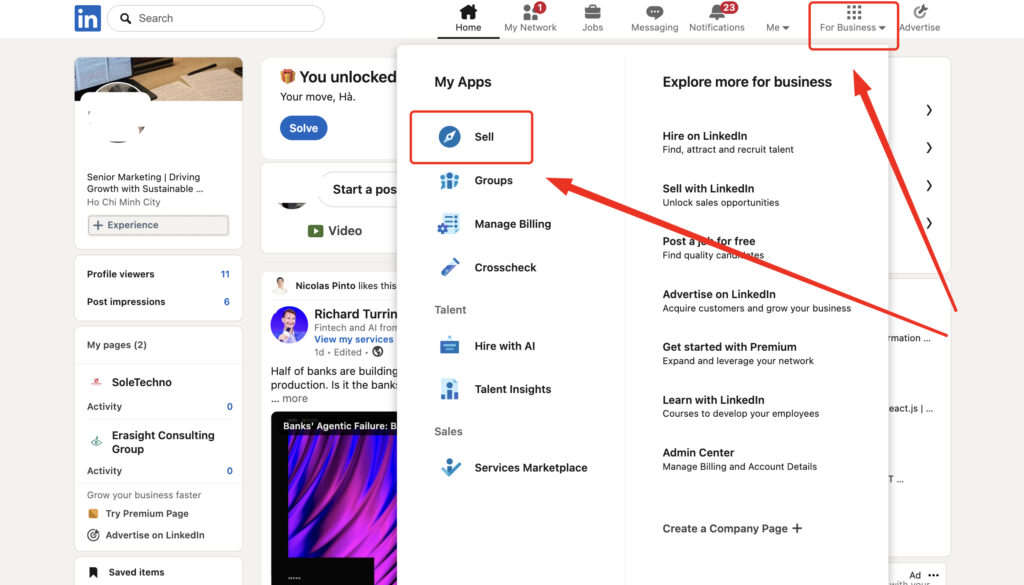
- Select Sell from the available LinkedIn products. Then choose your plan.
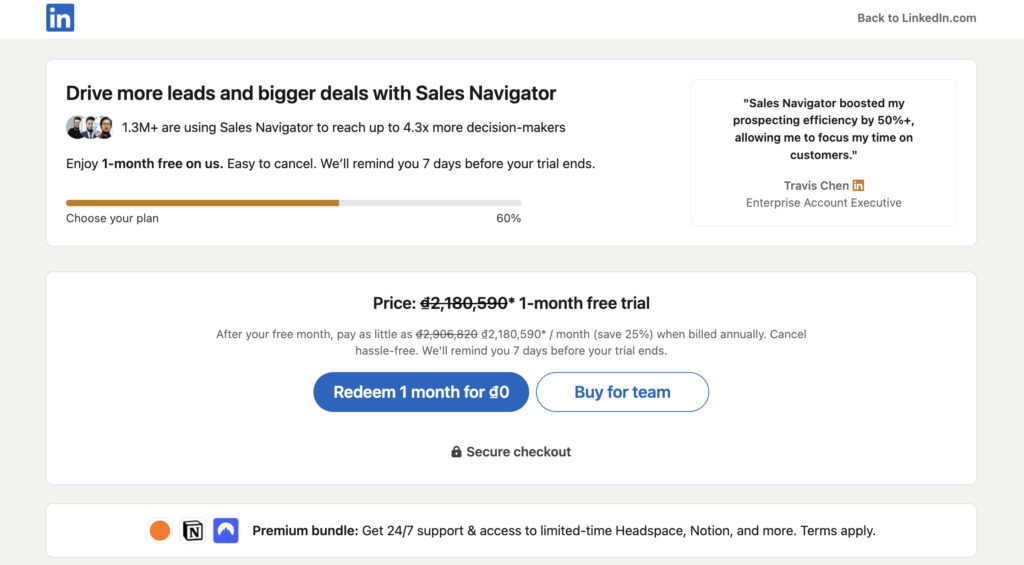
- If prompted, choose a Sales Navigator plan and complete the subscription setup.
- Once activated, open the Sales Navigator dashboard to start searching for leads and accounts.
You can also access Sales Navigator directly from its dedicated LinkedIn page after signing in.
Once inside, the first things worth setting up are your sales preferences, target industries, company size, geography, and job functions. These preferences help LinkedIn generate more relevant lead recommendations and make your future searches faster.
Why Do Sales Teams Actually Use It?
Sales teams use LinkedIn Sales Navigator mainly because regular LinkedIn search wasn’t built for volume prospecting, it was built for casual networking. And there’s a real gap between those two things.
Here’s the short version of what it solves:
- Free LinkedIn search caps results and hides deeper filters behind a paywall you don’t even see until you hit it.
- Cold email lists from scraped databases go stale fast; LinkedIn data updates in near real time because people update their own profiles.
- InMail gets read more often than a cold email from an unknown domain, simply because it arrives inside a platform people already check daily.
Don’t treat Sales Navigator as a numbers game tool. Reps who message 200 people a week with the same templated pitch tend to burn out their InMail credits fast and see abysmal reply rates. Fewer, better-targeted messages consistently outperform spray-and-pray approaches.
How Do You Set Up Sales Navigator for the First Time?
Setting up Sales Navigator well starts with defining your Ideal Customer Profile before you touch a single filter. Skip this step and you’ll drown in irrelevant leads within the first ten minutes.
Once your ICP is roughly sketched out (industry, company size, seniority level, geography), open the search tool and start layering filters one at a time rather than all at once. Watch how the result count shifts with each filter you add. If a filter drops your results to near zero, back off, it’s probably too narrow for this stage.
A few setup basics worth doing on day one:
- Connect Sales Navigator to your CRM if your plan supports it. Manual exports get old fast.
- Set up saved searches for your top two or three ICP segments.
- Turn on lead recommendations so LinkedIn surfaces similar contacts automatically.
- Build your first lead list before you send a single message. Organize first, message second.
What Filters Matter Most for Finding Leads?
The filters that matter most are seniority level, function, geography, and company headcount, in roughly that order for most B2B teams. These four alone will do most of the heavy lifting.
Beyond the basics, a few underused filters tend to separate decent prospecting from genuinely sharp targeting:
- Years in current position: helpful for catching people who recently stepped into a role and are more open to new vendors or tools.
- Posted content keywords: finds people actively talking about a topic relevant to your pitch.
- Groups: signals shared interest or professional community, useful for a warmer opening line.
- TeamLink: shows you if anyone in your company already has a connection to the lead, which is honestly one of the more underrated features in the whole tool.
| Filter Type | Best For | Watch Out For |
|---|---|---|
| Seniority Level | Reaching actual decision-makers | Too narrow shrinks your pool fast |
| Company Headcount | Matching your ICP size range | Doesn’t account for revenue |
| Geography | Territory-based selling | Remote-first companies break this logic |
| Posted Content Keywords | Catching active, engaged prospects | Requires manual review, not fully automated |
Is LinkedIn Sales Navigator Worth the Cost?
Whether Sales Navigator is worth it depends almost entirely on how much of your revenue comes from outbound B2B prospecting. If outbound is a core part of your job, it usually pays for itself within the first few closed deals.
For reps who mostly work inbound leads or referrals, the subscription can sit there half-used, which, to be fair, happens more often than sales managers like to admit. The tool is only as good as the process wrapped around it. A rep who logs in twice a month and fires off a handful of InMails isn’t going to see the same return as someone running a disciplined, weekly prospecting cadence.
Here’s a quick honest breakdown:
Pros:
- Significantly deeper search filters than free LinkedIn
- InMail credits reach people outside your existing network
- Saved lists and alerts keep prospecting organized over time
- CRM integration reduces manual data entry
- Lead recommendations surface contacts you might have missed
Cons:
- Monthly cost adds up, especially across a full sales team
- Learning curve for reps unfamiliar with advanced filtering
- InMail response rates vary wildly by industry and message quality
- Requires consistent use to justify the subscription
👉 Wondering what are LinkedIn Groups and whether they still matter? Discover how to use them for networking and B2B growth in 2026.
How Do You Turn Sales Navigator Leads Into Actual Conversations?
Turning a saved lead into a real conversation comes down to sending a message that references something specific about them, not a generic pitch dressed up with their first name inserted.
This is where a lot of reps stumble, honestly. They’ll spend forty minutes building a beautifully filtered list and then send the exact same three-sentence InMail to everyone on it. That’s not personalization, that’s just mail merge with extra steps.
A better approach usually looks something like: check their recent posts or job change, reference it in one sentence, connect it to a specific problem you solve, and ask a low-pressure question rather than pitching a demo straight away. Nobody wants to book a call in the first message. They want to feel like you actually looked at their profile before hitting send.
Save your best-performing InMail openers somewhere outside LinkedIn (a doc, a spreadsheet, whatever works) and revisit them monthly. What worked six months ago against a cold audience won’t necessarily land the same way now.
👉 If you’re exploring LinkedIn’s publishing features, you may also want to understand LinkedIn Pulse and how it evolved over time. Our guide on how to use LinkedIn Pulse explains what the feature was designed for, why it no longer exists as a standalone product in 2026, and what replaced it.
Common Mistakes Teams Make With Sales Navigator
Most mistakes with Sales Navigator come down to treating it like a bigger version of free LinkedIn search rather than a genuinely different workflow.
A few patterns show up again and again across sales teams:
- Building lists but never actually messaging anyone on them (the list becomes a graveyard).
- Ignoring saved search alerts, which means missing warm signals like job changes or new hires.
- Sending identical InMail copy to wildly different buyer personas.
- Not syncing with the CRM, leading to duplicate outreach from two different reps.
- Chasing volume metrics (messages sent) instead of quality metrics (replies, meetings booked).
None of these are dramatic failures on their own. But stacked together, they’re usually why a team ends up saying “Sales Navigator doesn’t work for us,” when really, the process around it never got built properly in the first place.
How to Manage Multiple LinkedIn Accounts With Multilogin Cloud Phone
Managing multiple LinkedIn accounts becomes more complicated once your prospecting workflow expands beyond a single profile. Sales teams, agencies, recruiters, and lead generation specialists may need to manage different LinkedIn accounts for separate markets, team members, client projects, or outreach campaigns. At that point, switching between accounts manually can become inefficient and harder to organize.
This is where Multilogin cloud phone can fit into the workflow. Instead of treating every LinkedIn account as part of the same browsing environment, teams can create separate mobile environments for different accounts. This makes it easier to keep account activity organized while managing outreach, prospecting, and follow-ups across multiple profiles.
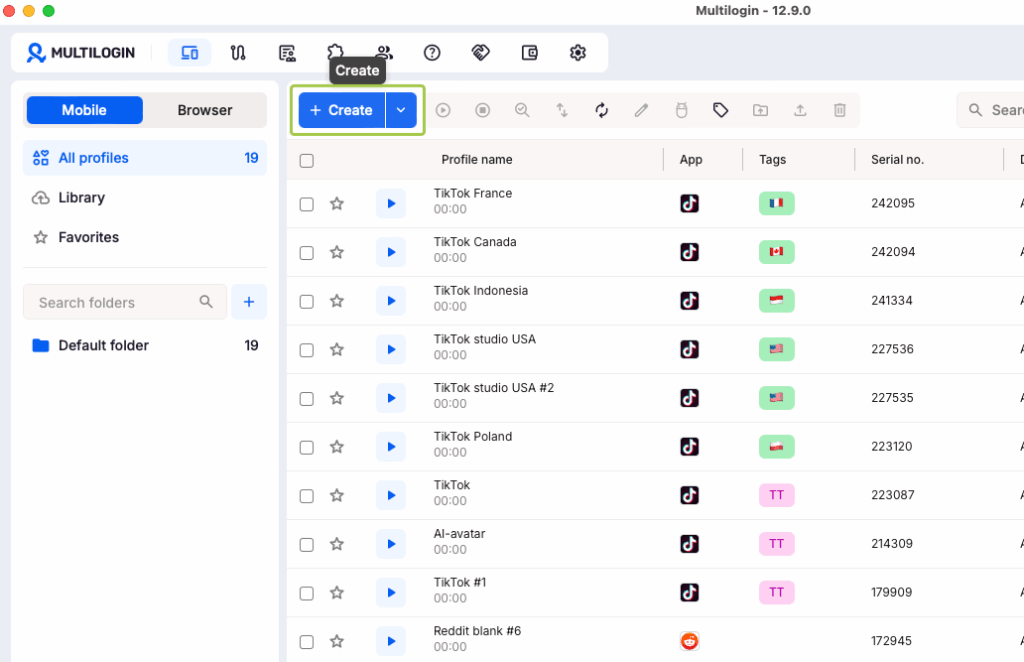
For teams already using LinkedIn Sales Navigator, this can be especially useful because prospecting often involves several repetitive tasks, including:
- Managing different LinkedIn profiles for separate campaigns or markets
- Reviewing Sales Navigator lead lists across multiple accounts
- Sending and tracking outreach from different profiles
- Keeping prospecting environments separated by account
- Organizing client or team-based LinkedIn workflows
- Managing LinkedIn activity from mobile-based environments
- Reducing the need to constantly log in and out of different accounts
A structured setup also makes it easier to assign specific LinkedIn accounts to specific workflows. For example, one profile may focus on a particular geography, while another handles a different buyer segment. Combined with Sales Navigator filters, saved searches, and lead lists, this gives teams a clearer way to separate prospecting activities instead of mixing everything into one account.
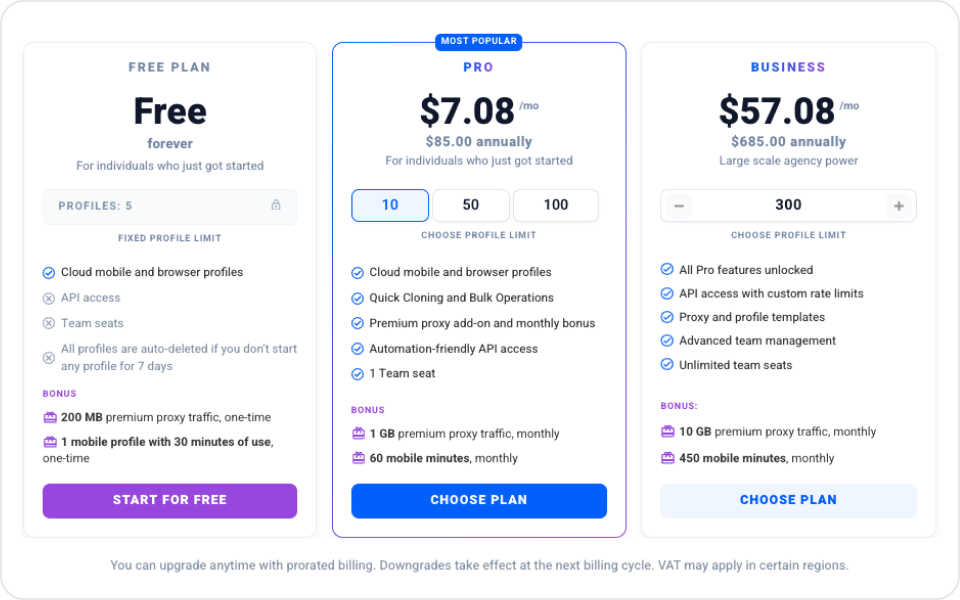
Try Multilogin for free! Multilogin Cloud Phone does not replace LinkedIn Sales Navigator. The two tools serve different purposes: Sales Navigator helps you find and qualify prospects, while Multilogin can help you organize the environments used to manage multiple LinkedIn accounts.
If your LinkedIn prospecting strategy is expanding across several profiles, building a structured multi-account workflow early can save time and reduce unnecessary operational friction.
👉 Explore Multilogin Cloud Phone to manage multiple LinkedIn account on cloud phones in a more organized way.